Adjustment
Raise the rear of the car and remove the hub cap with a screwdriver.
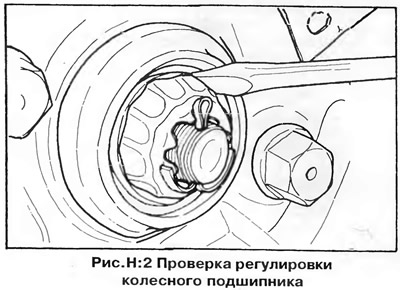
If the bearing is correctly adjusted, the thrust washer should move slightly with the screwdriver, as shown in fig. H:2, but must not rotate freely.
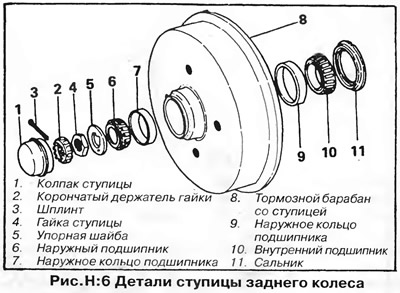
If bearing adjustment is required, remove the cotter pin from the hub stud and remove the slotted holder of the nut (pic. H:6). While rotating the wheel, tighten the hub nut until you feel resistance to wheel rotation, then loosen the nut just enough to allow the thrust washer to be moved with a screwdriver as described above.
Install the nut holder and new cotter pin, then press the hub cap into place. Lower the car to the ground.
Bearing replacement
Check the condition of the bearing by lifting the wheel and rotating it. Replace the bearing if the wheel rotates unevenly or with noise, and if the wheel has excessive play when rocking it up and down on the hub trunnion, if the play cannot be eliminated by adjustment.
The wheel bearing is a set consisting of inner and outer bearings, as well as a hub seal. Replace all parts as a set.
1. Raise and jack up the rear of the vehicle. Remove the wheel.
2. Remove the hub cap with a screwdriver. Remove the cotter pin from the hub stud and remove the slotted nut holder, hub nut and thrust washer (pic. H:6).
3. Remove the hub with the brake drum. If the drum cannot be removed, move the brake pads. If the rear brakes have manual adjustment, then turn the adjusting nut with a screwdriver through the hole in the brake shield to reduce the pads. On vehicles with automatic rear brake adjustment, turn the brake drum so that the top two wheel bolt holes are horizontal, then insert a screwdriver through the front hole and push the adjuster wedge up (see chapter "Brake system").
WARNING: On vehicles equipped with a brake pressure regulator, drum removal is difficult due to residual pressure in the right rear brake cylinder even with the brake pads shifted. To relieve residual pressure, press the pressure regulator lever, which is located above the axle beam, towards the rear axle.
4. Remove the outer bearing assembly from the hub.
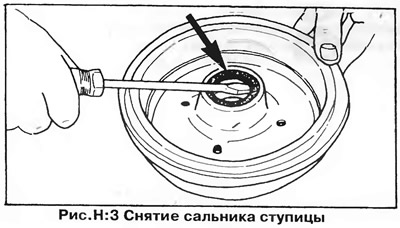
5. Remove the oil seal with a screwdriver and remove the inner bearing from the back of the hub (pic. H:3).
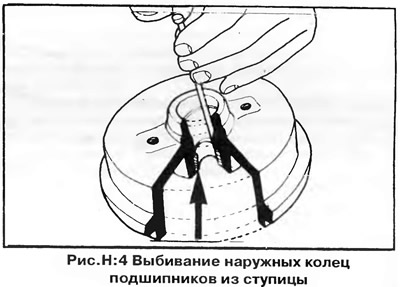
6. Knock out the outer rings of both bearings in different directions from the hub using a beard (pic. H:4), alternately striking at diametrically opposite points of the rings to prevent them from being skewed in the hole.
7. Clean the hub bore - remove any old grease and dirt.
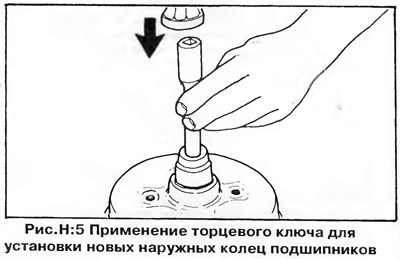
8. Press the new bearing outer races into the hub using a socket wrench or a metal tube (pic. H:5). Be careful not to damage the edges of the rings or the hole surface. Both rings must be pressed in as far as they will go.
9. Fill with multipurpose grease the space between the rollers of both bearings, as well as the space between the bearings in the hub. Leave room for the grease to expand when heated.
10. Insert the inner bearing from the inside of the hub and press in the new seal with the sealing lip against the bearing. Push the seal into place by tapping on opposite sides of the seal with a rubber mallet.
11. Apply grease to the lips of the oil seal and, carefully, so as not to damage the oil seal, slide the hub onto the trunnion.
12. Insert the outer bearing, then install the thrust washer and screw on the hub nut.
13. Adjust the bearing and fix the hub nut as described above.
14. Adjust rear brake pads. If the rear brakes are manually adjusted, use a screwdriver to turn the adjusting nut through the hole in the brake shield until the wheel is not braked, then turn the nut back just enough to allow the wheel to turn freely. On models with self-adjusting brakes, simply depress the brake pedal several times to set the brake pads into position.

Visitor comments