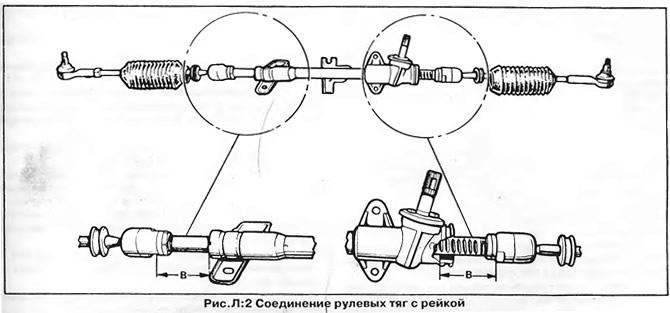
NOTE: To reduce the turning radius of the vehicle, since April 1975 the length of the steering rack (size "WITH" - pic. L:9) was increased from 67 to 69 mm on each side. Accordingly, the length of the steering rods decreased by 2 mm, except for the right steering rods of vehicles with automatic transmission - their length remained the same due to the layout features.
Tie rod - replacement
To adjust the convergence of the wheels, the right steering rod is used; the factory-installed left link has a fixed length. Only adjustable length tie rods are available as spare parts.
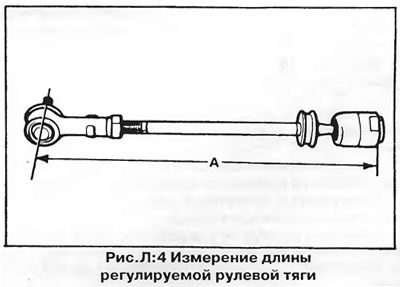
When replacing the factory left link, it is necessary to adjust the length of the new link to match the old one (size "A", pic. L:4). The length of the left tie rod should be 379 mm, and on early models (until April 1975) - 381 mm.

When replacing the right link, the new link must be adjusted in the same way as the old one - this will make it easier to adjust the wheel alignment in the future. Approximately the lengths of the right and left rods should be the same.
1. Loosen the bolts of the corresponding front wheel, raise the car and remove the wheel (see chapter "Basic rules for work").
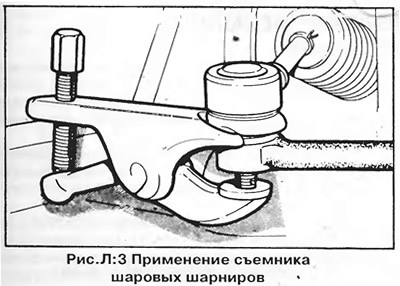
2. Remove the nut from the tie rod end ball stud and disconnect the pivot from the steering knuckle arm using a ball joint remover (pic. L:3).

3. Remove spring clips or collars of both covers of the steering mechanism and shift covers from a casing of the steering mechanism along steering drafts.
4. Set the steering gear to the middle position so that the dimensions "IN" (pic. L:2) both sides were the same.

5. Without changing the rack position, loosen the tie rod inner joint lock nut and unscrew the tie rod from the rack.
6. Transfer a rubber boot and collars of its fastening on a new steering draft. Replace the cover if it is damaged.
7 Adjust the length of the new tie rod (see above) and secure the tip with a locknut.
8. Screw the tie rod onto the rack so that the size "IN", shown in Fig. L:2, was the same for both sides of the steering gear. Secure the tie rod inner joint with a lock nut.
WARNING: On vehicles with automatic transmission, the size "IN" different from different angles; this ensures clearance between the tie rod and the automatic transmission housing.
9. Establish a rubber boot on the end of a casing of the steering mechanism and fix it with a collar. Secure the narrow end of the boot to the tie rod with a spring clip (clamp antennae must be directed upwards).
10. Attach the tie rod to the steering knuckle arm, install and tighten the ball stud nut. Secure the nut with a new cotter pin.
11. Install the wheel and lower the vehicle to the ground.
12. Check up a convergence of forward wheels as it is described earlier.
Ball joint and tie rod end - replacement
Wear on the tie rod ball joint cannot be compensated for by adjusting it; if worn, the joint must be replaced.
During the manufacture of the car, the removable tip is installed only on the right steering rod. The left tie rod is integral with the ball joint. If the left tie rod ball joint is worn, replace the tie rod assembly. Only tie rods with removable ends are available as spare parts.
1. Remove the trim cap from the relevant wheel and loosen the wheel bolts. Raise and jack up the front of the vehicle with the handbrake fully applied.
2. Loosen the tie rod end locknut about half a turn using two wrenches.
3. Remove cotter pin (in the presence of) and loosen the ball stud nut.
4. Disconnect the ball stud from the steering knuckle arm using a ball joint remover (pic. L:3). Do not try to knock out a finger - this can damage the steering mechanism.
5. Turn away a tip of steering draft, counting number of turns necessary for its removal.
6 Apply a little grease to the threads of the tie rod and screw the new tip onto it, making the same number of turns as it took to remove the old one.
7. Attach the hinge pin to the steering knuckle arm, screw and tighten the nut and secure it with a new cotter pin.
8. Tighten the tie rod end locknut. If the steering gear cover is twisted, remove the clamp and straighten it.
9. Install the wheel and lower the vehicle to the ground.
10. Check the front wheel alignment as described above.

Visitor comments