Brush replacement
1. Remove the starter from the engine as described earlier and remove the protective cap from the cover of the brush holders (pic. D:29).
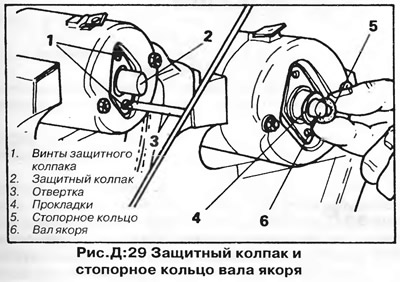
2. Remove retaining ring from armature shaft and remove washers and O-ring (pic. D:29).
3. Turn out two bolts and remove a cover of brush holders.
4. Raise the springs holding the brushes, pull out the brushes and remove the brush holder plate (pic. D:30).
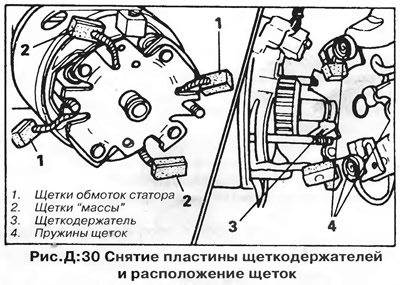
Replace the brushes if they are close to the minimum length (see section "Technical data"). The conductors of old brushes must be cut off in the middle between their beginning and the brush.
5. Solder the conductors of the new brushes to the wire scraps left on the brush holder and starter from the old brushes, ensuring a good soldering quality.
6. Install the brush holder plate onto the manifold, aligning the notches in the plate with the starter bolts. Install the four brushes in their respective sockets and secure with springs.
7. Make sure the brushes are fully pressed against the commutator.
8. Install the brush holder cover; the rubber insulator must fit into the cover cutout. Secure the cover with two screws.
9. Install spacers and retaining ring on the armature shaft (pic. D:29).
After installing the retaining ring, the anchor must not have axial play. If necessary, eliminate play by changing the thickness of the shim set under the circlip.
10. Apply a little lithium grease to the end of the armature shaft, install the protective cap and secure it with two screws.
Replacing the solenoid relay (solenoid)
The solenoid is attached to the starter drive cover and can only be replaced after the starter has been removed from the engine.
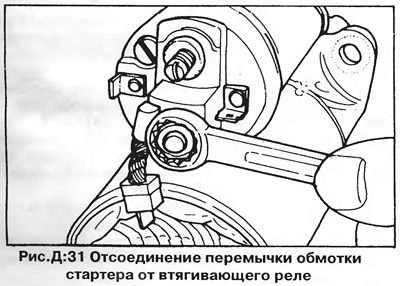
Disconnect starter winding lead (jumper) from the lower power terminal of the solenoid relay (pic. D:31). The solenoid is fixed with two screws. Remove the solenoid housing (pic. D:32), disconnect the solenoid core from the starter motor yoke and remove it together with the return spring.
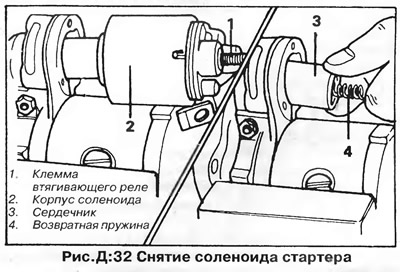
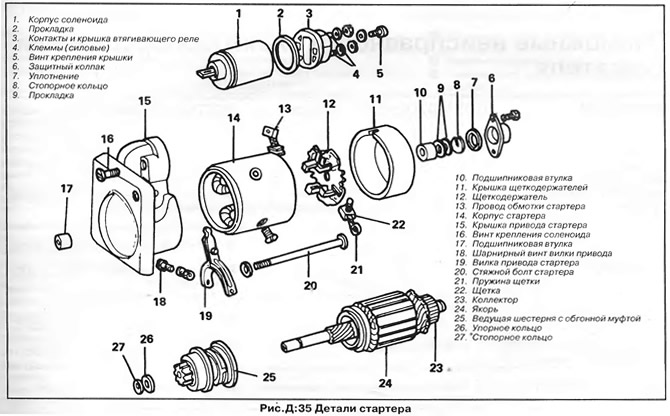
Install in reverse order. Hook the yoke to the fork lever inside the starter drive cover (pic. D:35), then install the solenoid housing (the return spring must be inside the core). Fix the solenoid with screws, then connect the lead (jumper) starter windings to the solenoid relay terminal.
Overrunning drive gear
Replacing the drive gear requires almost complete disassembly of the starter (pic. D:35).
1. Remove the solenoid switch and cover and brush holder plate as described above.
2. Separate the drive cover along with the armature from the starter housing by applying light blows to them.
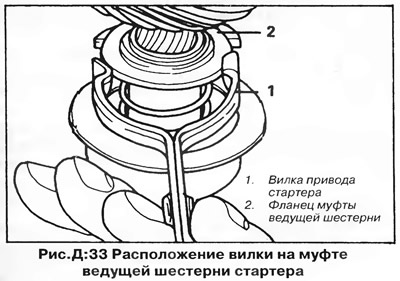
3. Remove the armature from the drive cover while disconnecting the drive yoke from the pinion clutch (pic. D:33).
4. To remove the drive gear from the armature shaft, you will need a suitable size tube or open end wrench.
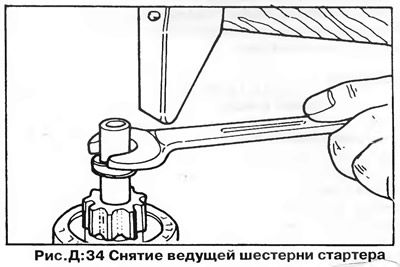
5. Clamp the armature in a soft jaw vise and use a tube or wrench to slide the thrust ring down the shaft (pic. D:34), to expose the circlip. Remove the retaining ring from the shaft groove, then remove the thrust ring and the drive gear with the clutch from the shaft.
6 The drive gear and freewheel are a single non-removable unit that cannot be repaired.
7. Slide the new freewheel gear and thrust washer onto the armature shaft. Install the circlip into the groove of the shaft, then slide the circlip over it using a puller.
8. Insert the anchor into the starter drive cover while engaging the starter drive yoke with the pinion clutch (pic. D:33).
9. Insert the armature and drive cover into the starter housing and push the cover all the way down with light blows (make sure that the rubber sealing block is in place at the fork lever in the drive cover).
10. Reassemble the plate and brush holder cover and reinstall the solenoid as previously described.
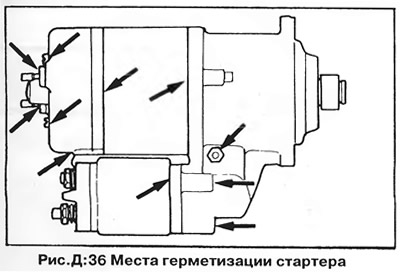
11. During assembly, seal the starter in the places shown in fig. D:36 to prevent water and dirt from getting inside.
12. Install the starter on the engine as previously described.
13. If the main parts of the starter (pic. D:35) are defective and cannot be repaired (e.g. anchor), replace the starter assembly.

Visitor comments