Removing
The engine is removed from the car along with the transmission, and then separated from it. It is not necessary to remove the hood, but it is recommended to do so for easier access.

1. Disconnect the wire "masses" from the battery.
2. Disconnect the bottom hose from the radiator and drain the coolant. Collect it in a clean container. While draining the fluid, the heater tap must be open.
3. Remove the drain plug from the oil pan and drain the engine oil into a clean container. Screw the plug back in.
4. Remove the heatsink assembly with fan and shroud (see chapter "Cooling system").
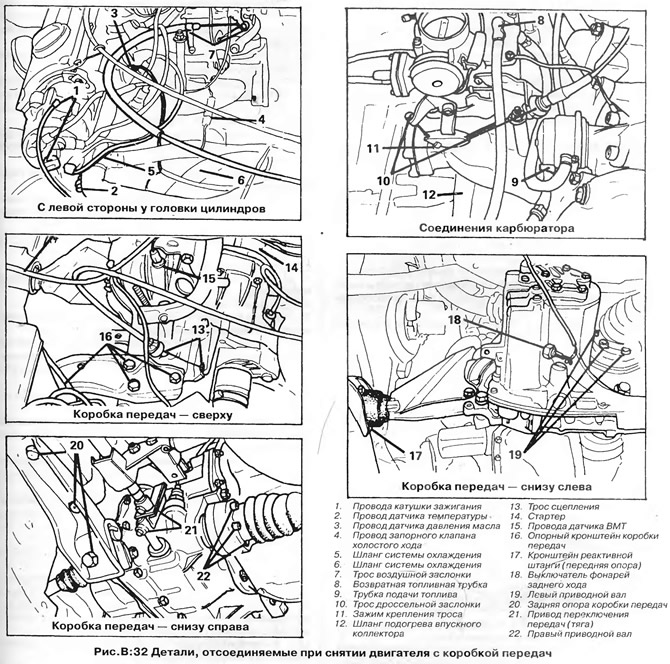
5. Disconnect the wires from the starter, carburetor, ignition coil, oil pressure sensor, temperature sensor and reverse light switch (2 and 18, fig. Q:32). Disconnect the wire "masses" engine and TDC sensor (in the presence of).

6. Disconnect the cooling system hoses from the pipes of the cylinder block and cylinder head (5 and 6, fig. Q:32). 7 Disconnect the accelerator cable from the carburetor and support bracket.
8. Disconnect the fuel supply pipe from the fuel filter and the fuel return pipe from the carburetor tee (8 and 9, fig. Q:32).
9. Disconnect the clutch cable from the gearbox housing (13, fig. Q:32).
10. Disconnect the speedometer cable from the transmission and separate the exhaust pipe bracket.
11. Turn out a bolt of fastening of the lever of a choice of transfers to draft of a gear change and separate the lever and draft from the friend.
12. Disconnect the drive shafts from the transmission and hang them to the body with wire hooks (see chapter "Front suspension").
13. Attach the engine to a hoist and raise it to take the load off the supports.
14. Disconnect the engine support from the base of the body (17, fig. Q:32), then remove the three nuts and through bolt holding the transmission support (20, fig. Q:32).
15. Disconnect fastenings of a transmission from a body floor, a rubber pillow and a case of the main transfer.
16. Turn the engine along with the transmission and carefully lift it out of the engine compartment (see chapter "Basic rules for work") so as not to damage the body.
17. Separate the engine and gearbox by unscrewing the bolts securing the clutch housing to the cylinder block (see chapter "Clutch and manual transmission").
Installation
Installing the engine is carried out in the reverse order; pay attention to the following:
1. Make sure that the engine/gearbox does not hit the drive shafts during installation.
2. Fix the engine with a transmission in a following order:
- A) Wrap bolts of fastening of a forward support to a transmission. Align the assembly so that the rubber pad fits into the socket on the body base without being stressed.
- b) Align the engine front support bracket with the corresponding hole in the cushion.
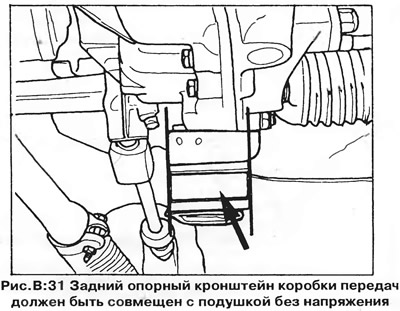
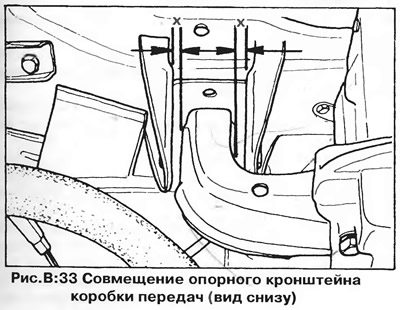
- V) Attach the rear support bracket to the transmission, aligning it with the rubber cushion on the body (pic. Q:33). Tighten the bolts and nuts to the torque specified in section "Technical data".
- G) Tighten the bolts of the front engine and gearbox mounts to the torque specified in section "Technical data".
- d) Secure the gear lever mounting bolt with wire.
- e) Fill the engine with the required brand of oil in the required quantity (see section "Technical data").


Visitor comments