Extraction
If we remove the camshaft from the engine that is in the car, we must first perform the following operations:
- A) Disconnect the negative cable from the battery.
- b) Remove the air filter housing.
- V) Remove the ignition device.
After:
1. Unscrew the nuts and bolts of the valve cover and remove the valve cover together with the gasket and reinforcing straps
2. Turn the crankshaft so that a notch made on the large distribution gear appears in the TDC hole of the distribution cover, and the notch (label) on the crankshaft pulley coincided with the TDC mark. The TDC indicator is located in front of the oil pump. Then turn the crankshaft a quarter of a turn counterclockwise so that none of the pistons are at TDC.
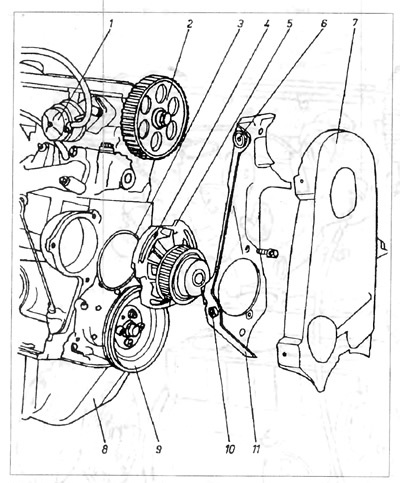
3. Unscrew and remove the distributor cover 7, paying attention to the fact that the oil level measuring tube and the wire to the engine ground are fixed to the upper bolts (pic. 1.4).
Pic. 1.4. Engine front view
1 - fuel pump; 2 - distribution gear; 3 - water pump gasket; 4 - elongated holes for the rotation of the water pump; 5 - water pump; 6, 10 - hole for screwing the distribution belt cover; 7 - distribution belt cover; 8 - oil sump; 9 - pulley; 11 - inner plate securing the distribution belt cover
4. Loosen the bolts holding the water pump, then turn the pump housing clockwise to reduce the tension on the timing belt. Remove timing belt from large timing gear.
5. Raise and remove the tube that lubricates the camshaft cams.
6. Pay attention to how the spring stops of the valve levers are inserted, then push them out of the grooves of the round head bolts (pic 1.5).
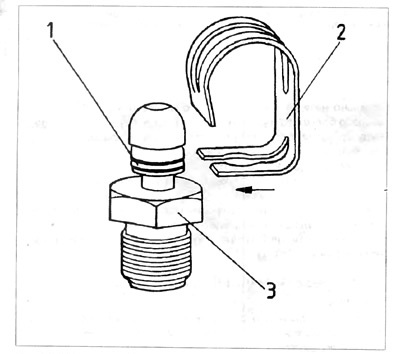
Pic. 1.5. Spring Stopper
1 - groove into which the stopper is inserted; 2 - spring stopper; 3 - valve adjustment bolt.
7. Number each lever so that during installation they are installed in their places, because they are tailored to specific cams. Then remove them using a screwdriver. It is necessary to pay attention that during the pulling out of the lever, the protrusion of the cam does not press on it. If the cam lug presses on the lever, you must first turn the camshaft with the lug up and only then remove the lever.
8. Unscrew the fastening bolt of the distribution gear to the shaft and remove it together with the spacer. The timing pulley can be fixed with two bolts, one of which will be placed in the hole and the other on the outside surface of the timing gear
9. Use a wooden mallet to knock the gear off the distribution shaft and remove the tongue.
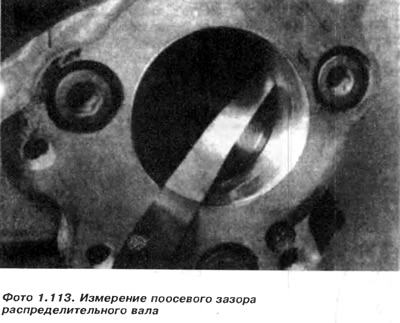
10. Using a gap gauge, check the longitudinal clearance of the distribution shaft. It is necessary to insert the meter plate between the edge of the distribution shaft and the cuff that secures the ignition apparatus (photo 1.113). The gap should not be more than 0.15 mm. Otherwise, the cuff of the ignition mechanism must be replaced.
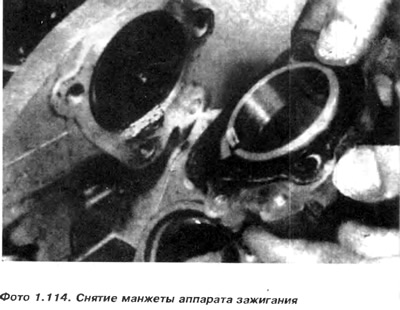
11. Unscrew the bolts and remove the cuff of the ignition mechanism (photo 1.114). Take off» gasket.
12. Carefully slide the camshaft back off the engine head, being careful not to damage the bearing surfaces as the cam lugs pass through them.
13. Remove the camshaft seal from the engine head from the timing gear side.
Control and repair
We check for wear on the surface of the camshaft journals and cams. The trunnions must not be scratched or frayed or excessively worn. If there are traces of scuffs in the bearings of the head, it is necessary to replace it with a new one. The shaft must be replaced with a new one or returned for restoration.
The surfaces of the cams must not be scratched. Even if one is definitely lower than the others, the shaft must be replaced or returned for restoration. Using a clock sensor mounted on a marking plate, we check the runout of the camshaft on the middle pin by rotating it on a prism. If the runout exceeds 0.02 mm, the shaft must be replaced. The shaft alignment operation is rather complicated. For its implementation, you must have a press and measuring instruments. In a situation where it is difficult to find a new shaft. you can give the old one for soldering and grinding the trunnions and cams.
Special enterprises have appropriate machines to perform such work. It is necessary to check the patency of the oil channels in the camshaft journals. If necessary, knock out the shaft cap and clean the channels.
Attention: When repairing the camshaft, it is forbidden to replace the seal on the side of the timing gear.
Installation
14. Installing the seal: oil the lip of the seal, its outer edge, as well as the seat in the camshaft housing. Then drive the seal into the socket using a wooden block or using a suitable tube with a diameter slightly smaller than the diameter of the socket. We put the sealant exactly into the hole, attach a metal tube to the sealant and drive the sealant into the hole with decisive, but not very strong blows. If at the first blow the seal came in only on one side, it is necessary to remove it and try to score again. During clogging, we pay attention that the sealant enters the hole evenly around the entire perimeter.
15. Lubricate the surface of the camshaft liners, then insert the shaft into place so as not to damage the lips of the oil seal and the surface of the liners.
16. Insert the cuff of the ignition mechanism together with a new gasket and tighten the socket head bolts.
17. Using a gap gauge, check the longitudinal clearance of the camshaft, (see point 5.10).
18. Insert a tongue into the camshaft socket, then put on the gear, insert the spacer and the fixing bolt. Blocking the toothed gear with a metal strip with two bolts, tighten the fixing bolt.
19. Set the piston of the first cylinder to the TDC position, then turn it one fourth of a turn counterclockwise. This will protect the valves from impacts on the piston and from damage during further work.
20. Fasten the valve levers by rotating the camshaft so that the corresponding cam is facing up, then insert the levers between the valve stem and cam and place them on the round head bolt.
21. Push the springy stoppers into the grooves on the round heads and place their upper edges on the levers so that the lever is pressed against the bolt.
22. Adjust valve clearances as described in point 30.
23. Rotate the camshaft so that the notch on the gear is pointing down and in line with the pointer on the timing cover plate (photo 1.108).
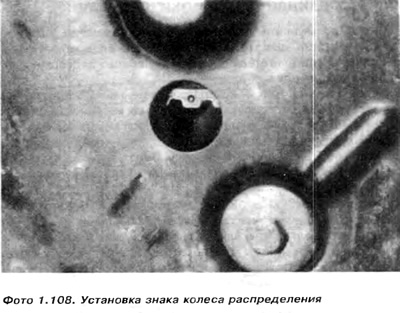
24. Turn the crankshaft a quarter of a turn clockwise so that the notch on the crankshaft pulley aligns with the gmp pointer at the front of the oil pump.
25. Install the distribution belt on the gears of the camshaft, crankshaft and water pump.
26. Using a screwdriver, turn the water pump counterclockwise and tighten the distribution belt. The belt is properly tensioned when it can only be rotated 90°by placing the belt between thumb and forefinger midway between the camshaft gear and the water pump gear (photo 1.110).
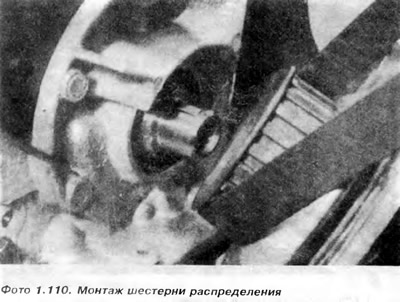
27. Tighten the water pump bolts when the belt tension is correct and check if the distribution setting points are in the correct positions.
28. Attach the oil level gauge tube to the engine housing.
29. Install the distribution cover, insert the bolts with the wire to the engine ground and the oil measuring tube bracket and tighten the bolts.
30. Press the tube lubricating the cams into the socket at the top of the cylinder head.
31. Install and tighten the ignition device.
32. Fix the valve cover with a new gasket. Install reinforcing straps and tighten nuts and bolts. If the shaft was removed from the engine in the car, you must:
33. Install the air filter housing.
34. Screw the wire to ground to the battery.

Visitor comments