2. Check whether the surfaces of the head and engine block are clean. then put a new gasket on the block, making sure that all the water and oil holes match - the gasket number should be on the side of the head.
3. Install the cylinder head on the gasket, then insert the bolts together with the brackets used to lift the engine.
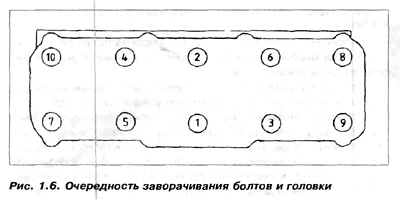
4. Using an adjustable wrench, tighten the bolts to the torque specified in "Technical Data", in the order shown in Fig. 1.6. Tighten head bolts to 40 Nm first, then 60 Km. At the last stage, tighten all bolts by 180°.


5. Attach the water pump, if removed.
6. Fasten the inner plate securing the distribution cover and loosely insert the water pump bolts.
7. If necessary, fix the camshaft.
8. Insert and tighten the upper bolt securing the inner plate of the distribution cover
9. Put on the crankshaft gear (if filmed) and timing belt on the crankshaft.
10. Rotate the camshaft until the notch on the toothed gear aligns with the pointer on the timing cover plate.
11. Turn the crankshaft a quarter of a turn clockwise so that the notch on the crankshaft pulley (temporarily with mounted) coincided with the TDC indicator in front of the oil pump.
12. Put the distribution belt on the camshaft gear and water pump gear.
13. Using a screwdriver, turn the water pump counterclockwise and tighten the distribution belt. Pull the belt 90°with the index and thumb fingers, grasping the belt midway between the camshaft gear and the water pump gear.
14. Tighten the water pump bolts when the belt tension is correct and check whether the distribution adjustment points are in the correct positions.
15. Attach the oil level gauge tube to the cylinder block.
16. Put on the distribution cover, insert the bolts with wire to the engine ground and the oil measuring tube bracket and tighten the bolts.
17. Press the tube lubricating the cams into the socket in the upper part of the cylinder head,
18. Fix the valve cover with a new gasket, place reinforcing belts and tighten the nuts and bolts. If the engine was in the car, it is necessary to follow the steps described in paragraphs 7a-7 in reverse order, as for removing it.

Visitor comments