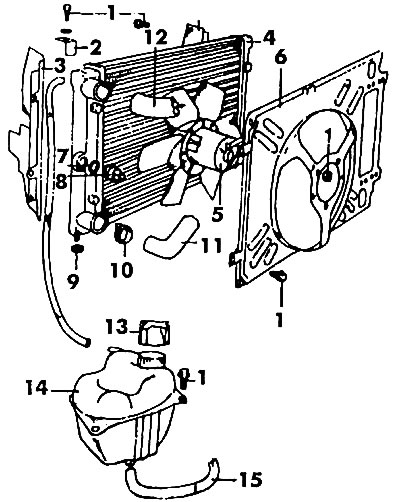
Pic. 104. Radiator mount: 1 - bolt (10 Nm); 2 - bracket; 3 - air intake; 4 - radiator; 5 - fan; 6 - fan casing; 7 - ring seal; 8 - thermal switch; 9 - rubber support; 10 - collar; 11 - lower branch pipe; 12 - top pipe, 13 - filler cap! expansion tank; 14 - expansion tank; 15 - branch pipe
Disconnect the battery. Drain the liquid from the cooling system as described above. Unscrew the cap of the expansion tank so that the liquid can flow out faster.
Disconnect the electrical wires to the thermal switch and electric fan.
Loosen the clamps securing the lower and upper radiator pipes and move them aside. Shown in fig. 104 band clamp 10 is recommended to be replaced with a worm.
Loosen the radiator mounting nuts at the top and lift the radiator together with the fan. At the same time, try to prevent damage to the radiator pipes.
Check the condition of the rubber mounts on the lower radiator mount.
If necessary, remove the fan shroud and then from the heatsink.
When installing the radiator, insert it into the radiator frame and make sure it is fully seated on the supports. Bolt the radiator to the top of the radiator frame. Connect the hoses to the radiator and secure with clamps. Connect the electrical wires to the thermal switch of the electric fan, and then the battery.
Pour liquid into the system (see above). Take a test drive and check if the fan turns on and off and if there are any leaks in the connections.

Visitor comments