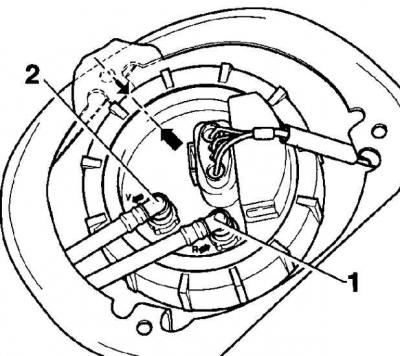
Location on the mounting flange of the supply and return fuel lines

- 1 - fuel supply line;
- 2 - fuel return line
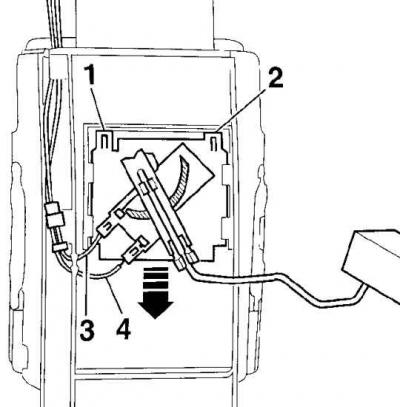
Mounting the fuel level sensor

- 1, 2 - fixing clips;
- 3, 4 - electrical connectors
Removing
1. Switch off ignition and remove a wire of weight from the accumulator.
2. Remove the rear seat, move the carpet back and unscrew the cap located above the fuel pump/fuel gauge.
3. Disconnect the fuel pump/fuel level sensor electrical connector.
4. Be aware that the fuel supply line is under pressure. Depressurize the fuel system before disconnecting the fuel line. To do this, loosen the fuel line clamp, then cover the connection with a rag and, being careful, remove the fuel hose from the fitting. Wear safety goggles to protect your eyes from fuel.
5. Loosen the clamp and remove the feeder from the fittings of the mounting flange (2) and return (1) fuel lines (see fig. Location on the mounting flange of the supply and return fuel lines). Close the ends of the pipelines with suitable plugs.

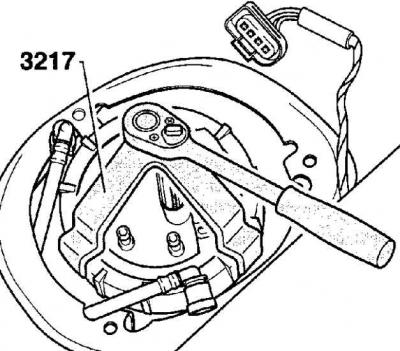
6. Using the VW-3217 special tool, unscrew the flange nut. If no special tool is available, unscrew the flange nut using a block of wood and a hammer.
7. Remove the mounting flange and sealing ring from the fuel tank opening.
8. From the inside of the mounting flange, mark and disconnect the fuel hoses.
9. Drain the fuel from the fuel pump into a suitable container.
10. Being careful, disconnect the gauge of level of fuel. To do this, disconnect the electrical connectors (3 and 4), use a screwdriver to release the fixing clips (1 and 2) and moving the sensor down, remove it (see fig. Mounting the fuel level sensor).
Installation
1. Install the fuel level sensor on the bracket and, by pressing on the fixing clips, secure it.
2. Connect the fuel lines from the reverse side of the mounting flange.
3. Install the fuel pump with fuel level sensor in the fuel tank. Dip the O-ring in fuel before installing.
4. Turn the fuel pump clockwise and fix it in the fuel tank.
5. Install the mounting flange so that the mark on the flange is aligned with the mark on the fuel tank (see fig. Mounting the fuel level sensor).
6. Screw on the flange nut and, using the special tool VW-3217, tighten it to a torque of 60 Nm.
7. Put the supply and return fuel hoses on the fitting of the mounting flange and secure them with clamps. The arrows on the fittings indicate the direction of fuel flow. Black fuel return hose.
8. Connect the electrical connector to the mounting flange.
9. Place the cover over the mounting flange and screw it on.
10. Check that the fuel and vent hoses are properly and securely fastened to the fuel tank.
11. Reinstall carpet and rear seat.
12. Connect ground wire to battery.

Visitor comments