Disc brakes with FN-3/FS-III caliper
Attention! The brake mechanisms of the front wheels of Golf cars can be equipped with two types of calipers. It is recommended to use the illustrations to determine the type of caliper on the car being repaired. Touran cars are equipped with FN-3 calipers only.
Removing
Attention! Brake linings belong to the category of materials for which an operating permit is required and they are included in the general operational permit register (AVE). In addition, they are selected by the manufacturer for certain car models. Therefore, it is recommended to use only linings offered by the manufacturer.
Attention! If the brake pads are to be reinstalled for later use, they should be marked before removal. Swapping the pads from the right wheel to the left and vice versa or swapping the outer and inner pads is not allowed. Be sure to change all front brake pads, even if only one of them has reached the maximum allowable thickness.
1. Mark the direction of rotation of the wheel with an arrow on the sidewall of the tire and loosen the wheel bolts.
2. Jack up the front of the car, place it on jack stands and, having unscrewed the fastening bolts, remove the wheel.
Attention! There is a risk of injury when jacking up a vehicle, so read the safety precautions before starting work.
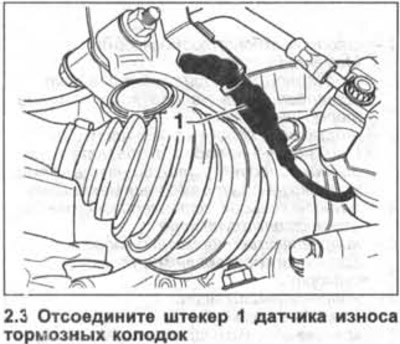
3. Disconnect plug 1 of the brake pad wear sensor (see illustration).
4. Caliper FN-3. Release the brake pad retaining spring from the holes on the caliper by prying it out with a screwdriver (see arrow in illustration).

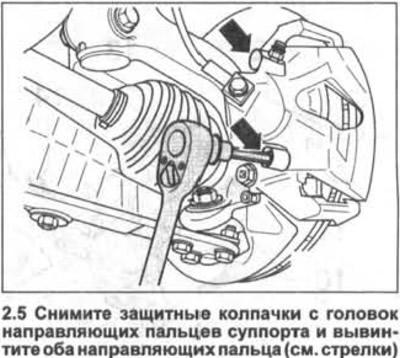
5. Remove the protective caps from the heads of the caliper guide pins and unscrew both guide pins (see arrows in illustration).
6. Remove the caliper from the shoe guide and secure it with wire to the body.
Attention! The caliper must be fixed so that it does not sag and its weight does not stretch or twist the connected brake hose.
7. Remove the brake pads.
Attention! With the brake pads removed, do not press the brake pedal. In this case, when you press the pedal, the piston will be squeezed out of the brake cylinder. If the piston is still out of the cylinder, remove the caliper and take it and the piston to a workshop for repair.
8. Before installing the pads, check the brake disc for the absence of grooves by running your hand over it.
Brake discs with a serrated surface can be modified by handing over to the workshop, if their residual thickness allows it. Be sure to grind both brake discs.
9. Measure the brake disc thickness, see relevant chapter.
Attention! Use only alcohol to clean the brake mechanism.
10. Clean the seating and guide surfaces of the brake pads in the caliper with a rag soaked in alcohol.
Do not use solvents containing mineral oils or sharp-edged tools. Remove, if any, any remaining adhesive film from the outer brake pads.
11. Check up a condition of a protective cap of the piston of the brake cylinder. Replace a damaged and cracked cap immediately, because dirt penetrating through a damaged cap quickly leads to depressurization of the caliper.
In this case, the brake caliper must be removed and disassembled (work is done in the workshop).
If the brake pads are very worn, then it is necessary to check the ease of movement of the piston of the wheel cylinder.
To do this, insert a wooden block into the caliper and ask the assistant to slowly press the brake pedal. The piston of the brake cylinder should move easily.
To check, you must install a spare serviceable caliper or use a caliper from another wheel. Be careful not to blow out the piston.
Rust on the piston can only be removed with brake fluid or alcohol. If the piston has a hard stroke, repair the caliper (work being done in the workshop).
Attention! When the piston is depressed, the brake fluid is squeezed out of the wheel brake cylinder into the expansion tank. Keep an eye on the level of brake fluid in the expansion tank and, if necessary, take it away to prevent it from splashing out.
Attention! To withdraw brake fluid from the expansion tank, use a siphon or a plastic bottle that is not destroyed by brake fluid. Do not use regular drinking water bottles! Brake fluid is poisonous and must never be sucked out by mouth through a hose. Use a siphon. And after replacing the brake pads, the level of brake fluid in the reservoir should not exceed the maximum mark, because. when heated, it expands. Leaking brake fluid flows down the brake master cylinder, destroying the paintwork and causing corrosion.
12. Remove the cap from the expansion tank with brake fluid and press the piston of the brake cylinder using a special pressing tool, for example, HAZET 4970/6 or a wooden block (see illustration).
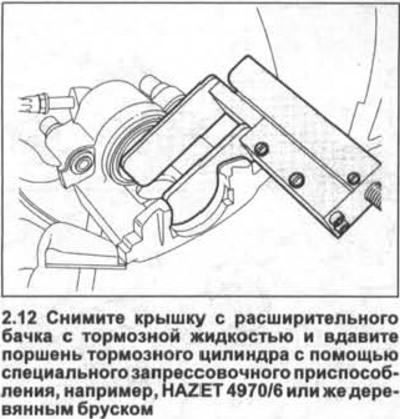
Attention! Do not distort the piston or damage its surface and its dust cap.
13. Before installing new brake pads, clean the guides and lubricate them with a paste that prevents brake squeaks, such as Liqui Moly.
Caliper FN-3
14. Remove the protective film from the back of the outer brake shoe and install the outer brake shoe into the guide.
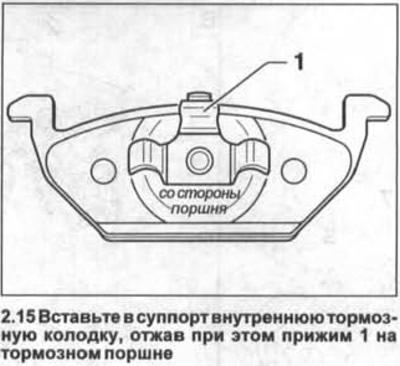
15. Insert the inner brake shoe into the caliper, while pressing the clamp 1 on the brake piston (see illustration).
16. Slide the caliper onto the shoe guide, being careful not to prematurely bond the outer brake shoe to the caliper.
Caliper FS-III
17. Install the brake pads in the guide.
Attention! The inner and outer brake pads are different from each other. The outer brake pad has a small, black-painted three-lobed clamp on the back, and a larger clamp on the back of the inner shoe.
18. Fix the caliper with brake pads at the bottom first (see arrow in illustration) on the guide. In this case, the protrusion on the caliper should go beyond the bar on the guide pads (see arrow in illustration).
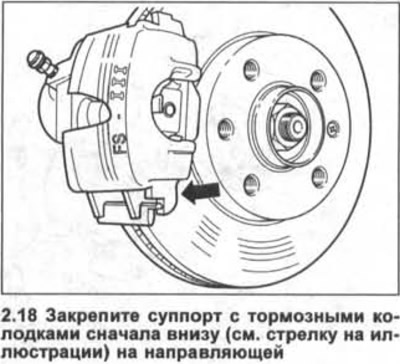
19. Screw in both caliper guide pins and tighten them to 30 Nm.
20. Put on the protective caps on the heads of the guide pins.
21. Caliper FN-3. Attach the retaining spring to the caliper (see illustration).
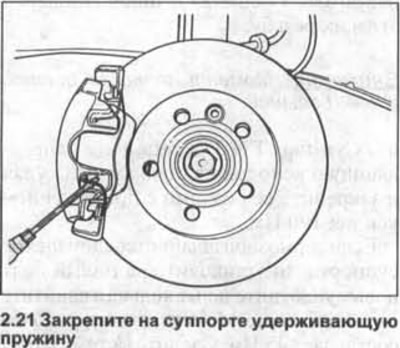
Attention! After the ends of the spring are installed in the holes, the spring itself should be brought under the shoe guide. If the spring is installed incorrectly, despite wear, the outer brake pad will not move, resulting in more idling of the brake pedal.
22. Establish the removed wheel according to the marks put at removal.
23. Screw in wheel bolts and lower the car on wheels.
24. Tighten the wheel bolts in a cross pattern to 120 Nm.
Attention! Squeeze out a few times a brake pedal against the stop, the strong resistance to pressing is not felt yet. When this action is performed, the brake pads are centered and they self-adjust to the working position.
25. Check the brake fluid level in the expansion tank. If necessary, add liquid to the maximum mark and screw on the cap.
26. Carefully run in new brake pads. To do this, slow down several times, bringing the speed from about 80 km / h to 40 km / h and lightly pressing the brake pedal. Let the brakes cool down in between.
Attention! New brake pads should be worn in. Therefore, before driving at least 200 km with new brake pads, avoid unnecessary braking until the car comes to a complete stop.
Note: Brake linings must not be disposed of with normal waste, as the dust that forms on them is hazardous to health. They need to be disposed of only at special points.
Attention! Make sure that:
- A) brake hoses are securely connected,
- b) brake hoses are fixed in holders,
- V) brake bleeders are screwed on,
- G) there is enough brake fluid in the expansion tank.
27. Perform a brake leak test by starting the engine.
To do this, depress the brake pedal with a force of 200-300 N (20-30 kg) and hold it for about 10 seconds. The pressure in the system and, accordingly, the resistance of the brake pedal, should not decrease. Check all connections for tightness.
28. Test drive on a light-traffic track. During the trip, do some braking.

Visitor comments