Attention! When the battery is disconnected, the registered information is deleted from the memory of some electronic control units.
The radio, fitted as standard on some models, has an access code that prevents the radio from being used if the radio is stolen.
The radio turns off, and the code is deleted not only when the battery is disconnected, but also when the receiver itself is removed, or when the fuse in the radio's power supply circuit blows.
Before disconnecting the battery, the access code a must be clarified and noted down. Otherwise, the radio can only be put into operation with the help of a manufacturer's representative or a VW workshop. The code is given in the instruction manual for the radio.
Attention! VW audio systems are specially matched to the vehicle model and do not have a code.
1 Activate the power window unit after connecting the battery. To do this, follow these steps:
- close all doors;
- lower all the windows all the way down, and then raise them again;
- hold the power window switch for each door in the «glass lift» at least one second;
- repeat the above steps again.
Attention! To avoid loss of stored data, it is recommended that when disconnecting the battery, use a stabilizer that is connected to the cigarette lighter before removing the terminals from the battery poles.
Removing
2. Turn off all consumers of the on-board network, as well as the ignition. This technique avoids damage to the electronic control units.
3. Open the hood.
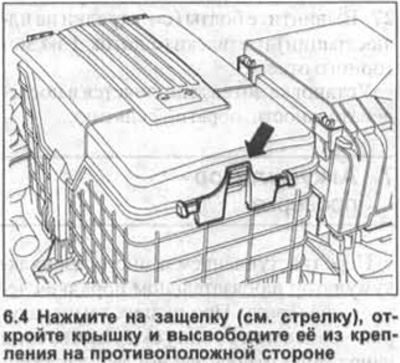
4. Press the latch (see arrow in illustration), open the cover and release it from the holder on the opposite side.

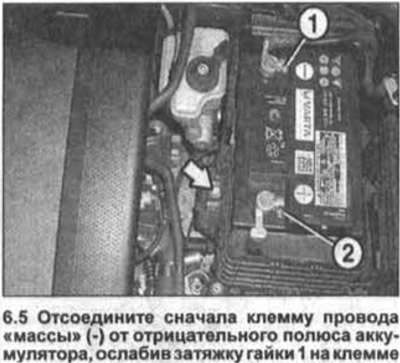
5. Disconnect the wire terminal first «masses» (-) from the negative pole of the battery by loosening the nut 1 on the terminal (see illustration). Set the disconnected wire aside.

Attention! Never disconnect or connect a terminal from the positive pole while the wire terminal is connected «masses» (-).
Attention! If only disconnected and not removed, then for safety reasons it is recommended to remove the terminals of both wires from the battery poles.
6. Loosen nut 2 on the positive potential terminal and remove it (see illustration 6.5).
7. Cars with a diesel engine. Remove the upper protective cover from the engine, as well as the air filter together with the intake air mass flow meter, see the relevant chapter.
8. Remove the bolt (see arrow in illustration 6.5) and remove the clamp that holds the battery in the tray.
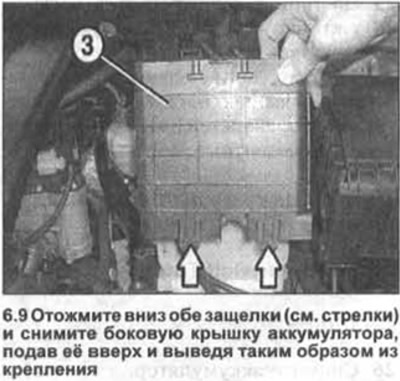
9. Press both latches down (see arrows in illustration) and remove the battery side cover by pushing it up and out of the mount.

10. Release the battery from the guide in the tray and remove it.
Attention! The battery usually has two folding handles on the top panel.
Installation
11. Make sure the new battery is the same size as the old one and fits into the bay.
12. Review battery handling precautions. The corresponding instructions are attached to the battery.
13. Before installing the battery, clean its poles with a brass brush.
14. Place the battery in the tray, making sure it is in the correct mounting position.
15. Accumulator with a central gas outlet. Make sure the ventilation hose is not pinched anywhere.
16. Batteries without central gas outlet hose. Make sure the vent on the top battery cover is not blocked.
17. Fix the accumulator with a clamping bracket and tighten the bracket bolt with a force of 20 Nm.
18. Replace the front battery cover.
19. Make sure that the ignition is turned off and the on-board network consumers are disconnected before connecting the power wire terminals to the battery poles.
Attention! Do not lubricate the battery poles, because in this case the fit of the wire terminals may be weakened.
20. First connect the positive potential wire terminal to the positive pole of the battery, and then the positive wire terminal «masses» (-). Tighten the nuts on both terminals with 6 Nm.
Attention! Do not connect the wire terminal to the positive pole of the battery if the wire terminal is connected to the battery «masses» (-).
Attention! To avoid damage to the battery case, the terminals on the poles should be installed without applying excessive force.
Attention! An incorrectly connected battery can cause damage to the generator and the electrical system as a whole.
21. Attach the battery cover and close it with the latches.
22. Enter, if necessary, the security code into the radio and tune it to the radio stations.
23. Adjust the clock if required.
24. Activate the power window unit.
25. Read, if possible, the codes of the malfunctions registered by the self-diagnosis unit and carry out the necessary repairs.
Battery tray
Removing
26. Remove the battery.
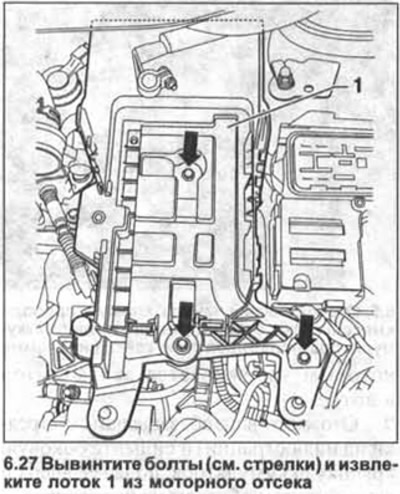
27. Remove the bolts (see arrows in illustration) and remove Tray 1 from the engine compartment.

The tray is installed in the reverse order of removal.

Visitor comments