Vehicles with 1.4 liter BCA petrol engine
Removing
1. Disconnect the battery.
2. Disconnect plug 1 on the back of the generator and disconnect the D+ terminal with a thin wire from it (see illustration).
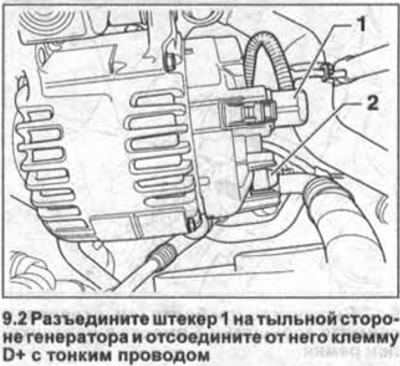
3. Remove cap 2, unscrew the nut under it and disconnect the B+ terminal with a large diameter wire from the generator (see illustration 9.2).
4. Remove the mudguard (protection) engine, see relevant chapter.
5. Designate the direction of rotation of the ribbed belt, loosen its tension and remove, see the relevant chapter.
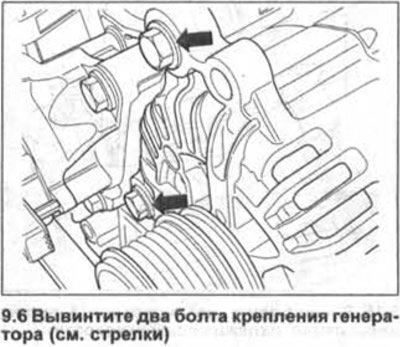
6. Unscrew the two bolts securing the generator (see arrows in illustration).
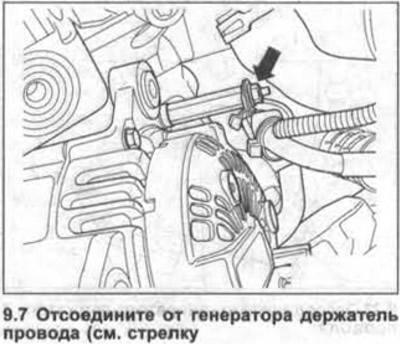
7. Disconnect the wire holder from the generator (see arrow in illustration).
8. Remove the generator from the engine compartment by lifting it up.
Installation
9. Knock out the two threaded bushings on the back of the generator by about 4 mm.
The generator is installed in the reverse order of removal.
Tightening torques for threaded connections fastening bolts:
- generator - 20 Nm
- B+ terminal nut - 15 Nm
Vehicles with 1.6 liter BGU/BSE/BSF petrol engines
Removing
10. Disconnect the battery.
11. Remove the top protective cover from the engine, see the relevant chapter.
12. Disconnect the D+ and B+ terminals from the generator.
13. Remove tank 1 with activated carbon (adsorber), releasing it from the mount and pushing it up (see arrows in illustration).
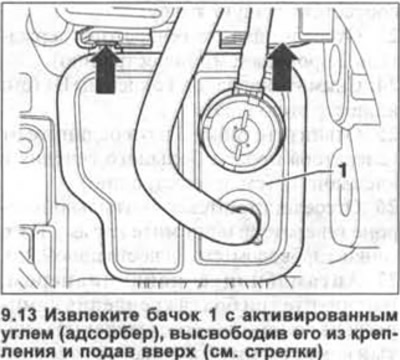
Place the tank away from the place of work, without disconnecting the hoses from it.
14. Remove the alternator drive belt, see the relevant chapter.
15. Release the coolant circulation hose from the holder 1 (see illustration).
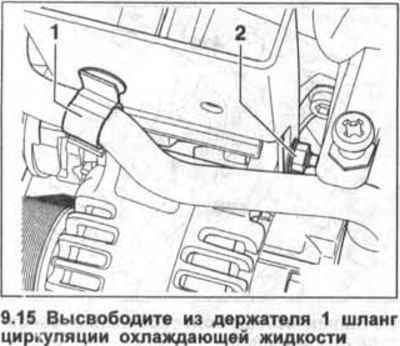
16. Remove the belt tensioner bracket by unscrewing the nut 2 (see illustration 9.15).
17. Remove the three bolts (see arrows in illustration) and remove the bracket 3 together with the belt tensioner.
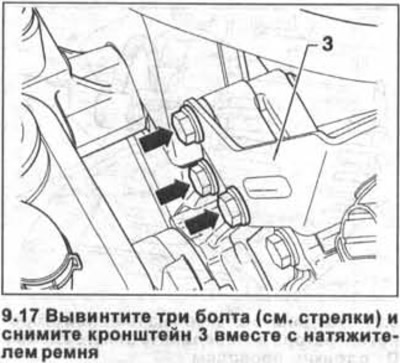
The further procedure for removing the generator is the same as for cars with a 1.4-liter engine.
Installation
18. Knock out the two threaded bushings on the back of the generator by about 4 mm.
The generator is installed in the reverse order of removal.
Tightening torques for threaded connections fastening bolts:
- generator - 23 Nm
- ribbed belt tensioner bracket bolts - 23 Nm
- B+ terminal nut - 15 Nm
Vehicles with 1.4-/1.6-litre FSI petrol engine BKG/BLN/BA G/BLF/BLP
Removing
19. Disconnect the battery.
20. Remove the ribbed belt, see illustration.
21. Unscrew the top bolt of fastening of the generator (see arrow in illustration).
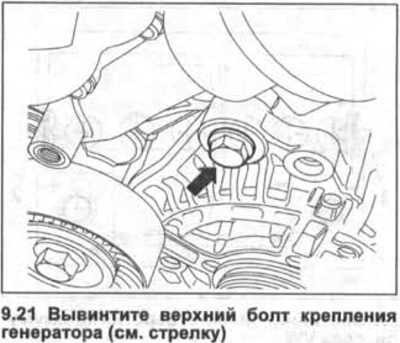
22. Remove the engine mudguard, see relevant chapter.
23. Disconnect the holder 2 wires from the generator (see illustration).
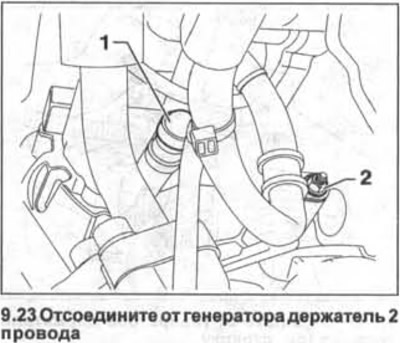
24. Remove cap 1 from terminal B+ (see illustration 9.23).
25. Unscrew the nut 3 and disconnect the large wire with terminal B+ from the generator (see illustration).
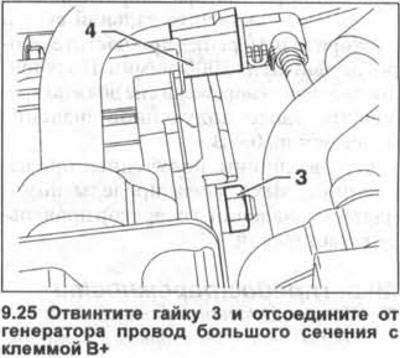
26. Disconnect plug 4 on the back of the generator and remove the D+ terminal with a thin wire (see illustration 9.25).
27. Cars with air conditioning. Unscrew the three bolts securing the air conditioning compressor and secure the removed compressor to the body without disconnecting the refrigerant circulation hoses from it. Do not open the refrigerant circuit!
Attention! The air conditioning hoses must not be stretched or kinked.
28. Unscrew the bottom bolt of fastening of the generator and remove the generator, having submitted it downwards.
Installation
29. Knock out the two threaded bushings on the back of the generator by about 4 mm.
The generator is installed in the reverse order of removal.
Tightening torques for threaded connections fastening bolts:
- generator - 23 Nm
- air conditioning compressor mounting bolts - 25 Nm
- B+ terminal nut - 15 Nm
Vehicles with 2.0 liter FSI petrol engine AXW/BLR/BLX/BLY
Removing
30. Disconnect the battery.
31. Remove the top protective cover from the engine, see the relevant chapter.
32. Remove the air filter, see the relevant chapter.
33. Remove the inlet pipeline.
34. Disconnect the D+ and B+ terminals from the generator.
35. Golf cars. Remove the activated charcoal canister (adsorber), releasing it from the mount and pushing it up (see arrows in illustration 9.13). Place the tank away from the place of work, without disconnecting the hoses from it.
36. Remove the ribbed belt, see the relevant chapter.
37. Unscrew the three bolts securing the generator bracket and remove the bracket together with the belt tensioner.
The further procedure for removing the generator is the same as for cars with a 1.4-liter gasoline engine.
Installation
38. Knock out the two threaded bushings on the back of the generator by about 4 mm.
The generator is installed in the reverse order of removal.
Tightening torques for threaded connections fastening bolts:
- generator - 23 Nm
- ribbed belt tensioner bracket bolts - 23 Nm
- B+ terminal nut - 15 Nm
Vehicles with a 2.0 liter AXX TFSI petrol engine
Removing
39. Disconnect the battery.
40. Unscrew two bolts of fastening of an air inlet.
41. Disconnect the intake air mass flow meter plug attached to the air intake.
42. Using special pliers, for example, HAZET 798-5, release the hose clamp on the air intake and disconnect the hose.
43. Remove the top protective cover from the engine.
44. Disconnect the boost air line by removing the retaining clip with a screwdriver and disengaging the clip. At the opposite end of the pipeline, release the clamp with special pliers, for example, HAZET 798-5, and disconnect the hose.
45. Unscrew the mounting bolts and remove the boost air pipe from the engine compartment.
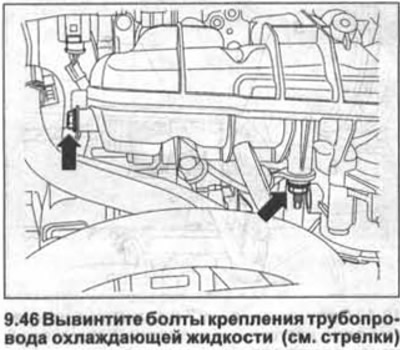
46. Unscrew bolts of fastening of the pipeline of a cooling liquid (see arrows in illustration). The pipeline may not be removed.
47. Remove the activated charcoal tank (adsorber), releasing it from the mount and pushing it up (see arrows in illustration 9.13).
The further procedure for removing the alternator is the same as for vehicles with a 2.0-liter FSI gasoline engine.
Installation
48. Knock out the two threaded bushings on the back of the generator by about 4 mm.
The generator is installed in the reverse order of removal.
Tightening torques for threaded connections:
- alternator mounting bolts - 23 Nm
- B+ terminal nut - 15 Nm
Vehicles with a 1.9 liter diesel engine
Removing
49. Disconnect the battery.
50. Remove the top protective cover from the engine, see the relevant chapter.
51. Remove the noise-absorbing gasket above the engine.
52. Disconnect the charge air line 3 by removing the retaining clip 1 with a screwdriver and disengaging the clip (see illustration).
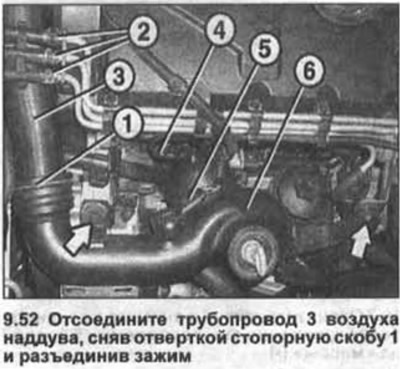
53. Disconnect plastic hoses 2 by unclenching with special pliers, for example, HAZET 798-5, fastening clamp (see illustration 9.52).
54. Remove the pipe 3 boost air from the engine compartment (see illustration 9.52).
55. Disconnect the low pressure hose 4 (see illustration 9.52).
56. Disconnect plug 5 (see illustration 9.52).
57. Remove the two top bolts (see arrows in illustration 9.52), which fasten the charge air pipeline 6.
58. Remove the engine mudguard, see the relevant chapter.
59. Unscrew the lower bolt of fastening of the charge air pipeline, disconnect its lower end and remove the pipeline 6 from the engine compartment by pushing it upwards (see illustration 9.52).
60. Release the fuel filter from its holder and, without disconnecting the hoses from it, place it away from the place of work, see also the corresponding chapter.
The further procedure for removing the generator is the same as for cars with a 1.4-liter gasoline engine.
Installation
61. Knock out the two threaded bushings on the back of the generator by about 4 mm.
The generator is installed in the reverse order of removal.
Tightening torques for threaded connections fastening bolts:
- generator - 20 Nm
- B+ terminal nut - 15 Nm
Vehicles with a 2.0 liter diesel engine
Removing
62. Disconnect the battery.
63. Remove the top protective cover from the engine, see the relevant chapter.
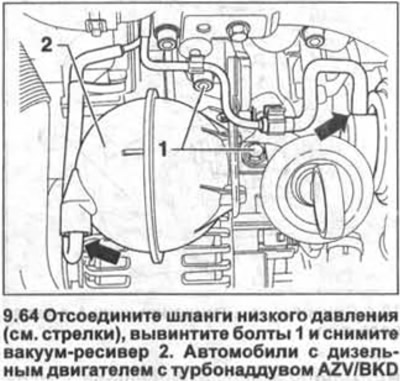
64. Vehicles with AZV/BKD turbocharged diesel engine. Disconnect low pressure hoses (see arrows in illustration), unscrew the bolts 1 and remove the vacuum reservoir 2.
65. Release the fuel filter from its holder and, without disconnecting the hoses from it, place it away from the place of work, see also the corresponding chapter.
The further procedure for removing the generator is the same as for cars with a 1.4-liter gasoline engine.
Installation
66. Knock out the two threaded bushings on the back of the generator by about 4 mm.
The generator is installed in the reverse order of removal.
Tightening torques for threaded connections fastening bolts:
- generator - 20 Nm
- B+ terminal nut - 15 Nm

Visitor comments