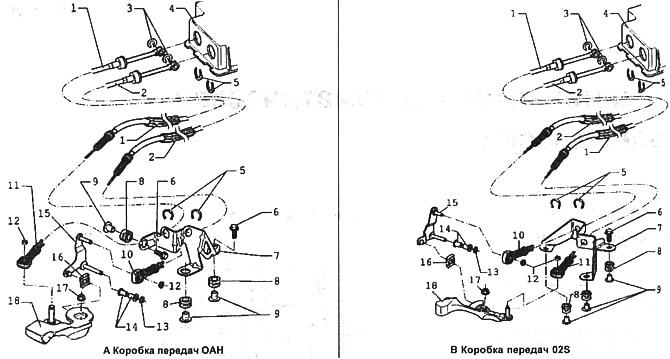
2.0. Gear selection cables
1, 2 - gear selection cables
3 - lock washer. To be replaced after each disassembly
4 - gear lever housing
5 - lock washer. To be replaced after each disassembly
6 - bolts. Tightening torque 20 Nm
7 - cable support bracket
8 - bracket mounting
9 - spacers
10 - cable clamps
11 - cable clamps
12 - lock washer. To be replaced after each disassembly
13 - lock washer. To be replaced after each disassembly
14 - bushings
15 - gear selection lever
16 - stopper
17 - nut. Tightening torque 23 Nm. The nut is self-locking and must be replaced after each dismantling
18 - gear lever
Attention! Before proceeding with the adjustment procedure, make sure that the gear selection components are not damaged and the clutch is in good condition.
Remove the cable lock washers carefully so as not to damage the cables.
The select cable has a counterweight attached to it, so the cable must be installed in such a way that the teeth mesh properly (see illustration 2.0).
The gearshift mechanism must have free play.
1. Place the transmission in neutral position.
For vehicles with 02S gearbox, remove the air filter.
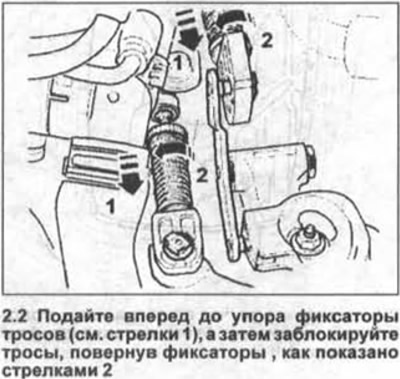
2. Push the cable clamps forward as far as they will go (see arrows 1 in the illustration), and then lock the cables by turning the latches as shown by arrows 2.
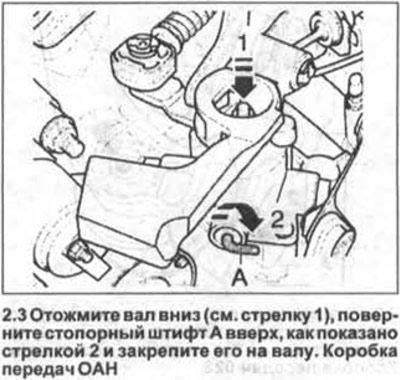
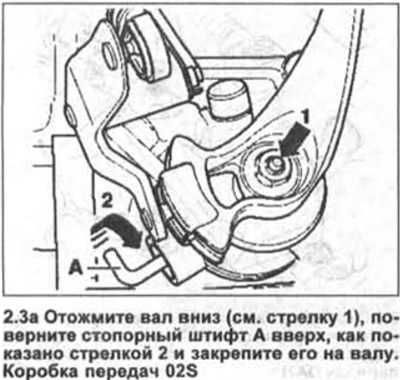
3. Lock the shift shaft.
To do this, press the shaft down (see arrow 1 in illustration), turn lock pin A upwards as shown by arrow 2 and secure it to the shaft.
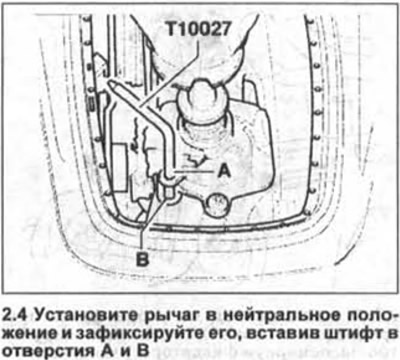
4. Disconnect the gearshift lever cover from the center console, remove, if any, the soundproofing gasket, and, after placing the lever in the neutral position, fix it by inserting the pin into holes A and B (see illustration).
5. Turn the clamps of both cables in the opposite direction to those shown in illustrations 2.3 and 2.3a.
The release spring of the latches will return them to the mounting position.
6. Replace lock pin A (see illustrations 2.3 and 2.3a) in the opposite direction of arrow 2.
7. Remove stop pin TI0027 from holes A and B (see illustration 2.4) and, if present, reinstall the sound deadening pad.
8. Replace and secure the shift lever cover to the console. On models with 02S transmission, reinstall the air filter.
Check of functioning of the mechanism of a gear change
In neutral position, the shift lever should be between 3rd and 4th gears.
9. Squeeze out coupling and several times alternately include all transfers.
Pay special attention to the reverse gear lock. If the gear shift is difficult, then check the vertical play of the gear shift shaft.
To do this, ask an assistant to monitor the shaft at the moment the 1st gear is engaged.
After turning it on, move the gear lever all the way to the left and release it. Shaft shift (see illustrations 2.3 and 2.3a) should move no more than 1 mm. Otherwise, repeat the adjustment.

Visitor comments