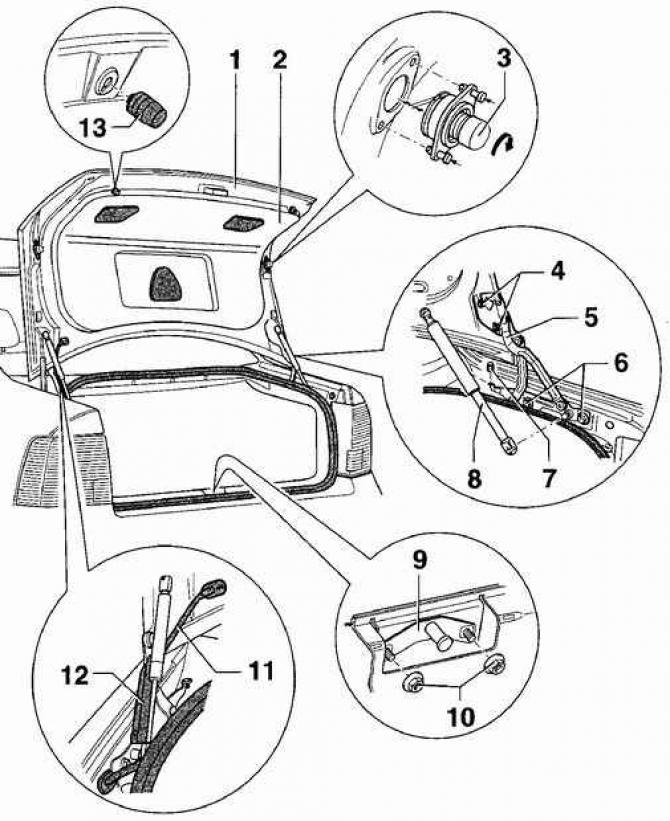
Elements of fastening of a cover of a luggage carrier

- 1 - trunk lid,
- 2 - upholstery of the trunk lid,
- 3 - buffer,
- 4 - nuts, 25 Nm,
- 5 - trunk lid hinge,
- 6 - bolt, 20 Nm,
- 7 - rubber buffer,
- 8 - pneumatic support,
- 9 - lock plate,
- 10 - nut, 7 Nm,
- 11 - electrical wiring,
- 12 - hinge cover,
- 13 - rubber buffer
Removing
1. Remove the trunk lid trim.
2. Disconnect the electrical connectors in the trunk lid.
3. Tie a thin long cord to the wiring and remove the wiring from the trunk lid. Untie the cord and leave it in the trunk lid. In the future, the cord will be required to tighten the electrical wiring into the trunk lid.
4. Using a marker or pencil, mark the location of the hinge loops on the trunk lid.
5. Have an assistant hold the trunk lid open and remove the pneumatic stop on the trunk lid.
6. Unscrew the hinges from the trunk lid and remove the trunk lid from the vehicle.
Installation
1. Install the trunk lid on the car and, in accordance with the markings made earlier, screw the hinges to the trunk lid.
2. Check and use the hinges to adjust the gaps between the trunk lid and the rest of the body. Tighten the nuts securing the hinges to the trunk lid to 20 Nm.
3. Tie the wiring to the cord and pull the cord into the trunk lid. Untie the cord and connect the electrical connector to the trunk lid.
4. Attach the pneumatic stop to the trunk lid.
5. Use a jet of water to check if the trunk is leaking:
- one person with a flashlight must be inside the trunk,
- a second person must direct the jet of water at the trunk.
6. If a trunk leak is detected, use the hinges and the lock plate to slightly lower the trunk lid.
7. If the trunk seal is cracked, replace it.
8. To protect the seal, apply a thin layer of sealant to it.
9. Install the trunk lid trim.
10. While the vehicle is moving, check to see if the trunk lid vibrates.

Visitor comments