«Above» remove the battery cover, air filter and engine cover. Then the engine and gearbox are suspended so that the left support of the power unit can be removed.
«Bottom» dismantle antinoise isolation and wring out power shafts. The gearbox is then lowered using the gearbox jack.
Note: Do not remove attachment bracket.
Raise the vehicle.
Set the selector lever to position «R».
Remove the engine cover air filter with suction pipe.
Remove the battery and its casing.
Unscrew the bolts securing the ATF cooler to the battery cover, remove and set it aside.
Remove the battery cover.

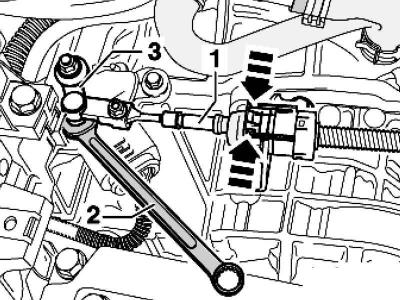
Pic. 3.89. Removing the selector lever cable
Manually depress the retainers of the selector lever cable 1 and remove it from the support 2 (pic. 3.89).
Do not use pliers to avoid breaking the support retaining plate.

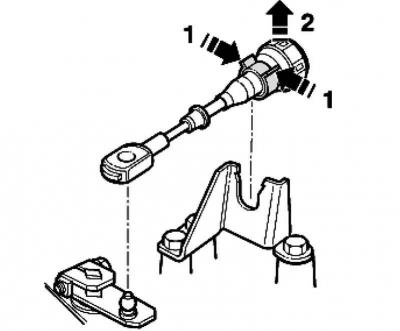
Pic. 3.84. Rope release
Then press the cable from the ball head 2 (pic. 3.84).
Unscrew the bolts of the upper wire holder.
Unscrew the bolts of the lower wire holder.
Unscrew bolts of pipelines of liquid ATF.
Disconnect electrical connectors from gearbox and starter.
Remove the starter top bolt.
Unscrew the upper bolts securing the gearbox to the engine.
The bolts can be loosened/tightened with a ring wrench. Observe the minimum tightening torque when tightening.
The ring wrench also facilitates installation work.
Bring the traverse and moor it to the engine-gearbox assembly. Don't lift them up.

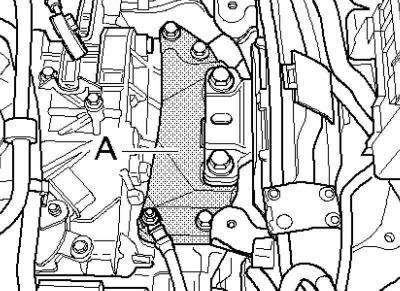
Pic. 3.90. Automatic transmission console
After that, you can unscrew all six bolts of console A (pic. 3.90).
The console is removed later, after the gearbox is lowered.
Press the brake pedal. At this time, the assistant must unscrew the bolt of the left drive shaft.
Note: After this, do not lower the vehicle.
Remove the noise isolation housing.
If the engine has a heat shield above the right drive shaft, remove it.
Disconnect both electrical connectors from the gearbox.
Remove the lower part of the left wing locker.
Remove the starter.

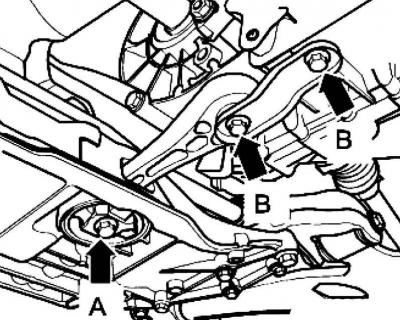
Pic. 3.91. Rolling bearings
Remove the rolling bearings, first A, then B (pic. 3.91).
When installing, tighten support B first, then A.
On both sides, unscrew the nuts of the lower suspension arm.
Press both drive shafts out of the gearbox.
Remove the left drive shaft.
Raise the right shaft as high as possible and secure in this position.
When doing this, do not damage the protective coating of the shafts; for this, use plastic cable ties.
After that, you can remove the power unit support console. To do this, slightly lower the engine together with the gearbox using the spindle of the traverse A.
Six turns are enough.
If the bracket for the exhaust system assembly is installed, it must be removed together with the gearbox
Turn out the bottom bolts of fastening of KP to the engine.
For insurance, do not unscrew one well-accessible bolt.
Unscrew the two bottom bolts.
The hole for unscrewing the nuts of the torque converter on the rear wall of the engine is closed with a rubber cap.
Remove the cap.
Loosen the six torque converter nuts with a socket wrench.
Note: When installing, pay special attention to ensure that the engine is screwed on neatly when connecting the gearbox to the engine. Hold the flywheel ring gear from the outside with a screwdriver. Thus, during installation, the studs will go into the holes of the metal gasket of the leash.
Before removing the last mounting bolt, support the transmission with an engine and transmission jack, bracket and template.
Only now you can unscrew the last bolt.
Disconnect the gearbox from the engine.
Note: Keep an eye on the torque converter. It must be disconnected along with the gearbox.
Note: When lowering, be aware of the free play of the gearbox relative to the power unit support. Adjust the bracket further if necessary.
It should be borne in mind that when installing a new gearbox, it is necessary to rearrange the support and the holder of the selector lever cable.

Visitor comments