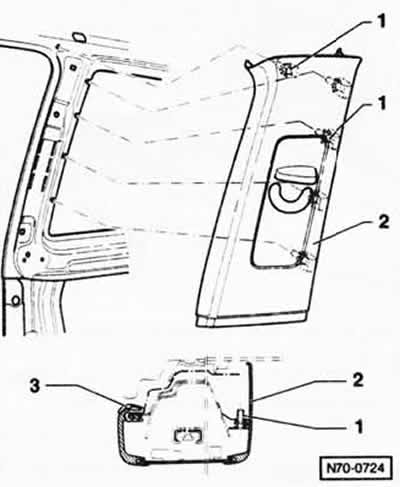
Upper trim, 3-door model
Removing
Remove the sill trim see relevant chapter below.
Remove rear side trim see relevant chapter below.

Release top trim -2- at spacer clips -1- from B-pillar and pull out of door seal -3- from below.
Remove the front seat belt at the bottom from the guide bracket, see further chapter «Removal and installation of a forward seat belt».
Pull out the seat belt through the height adjustment mechanism and remove the trim.
Installation
Check the clamps for damage and correct positioning on the cladding, replace the clamps if necessary.
Installation is carried out in reverse order. When doing this, ensure that the door seal is positioned over the edge of the trim and that the belt height adjustment knob is correctly positioned in the adjustment mechanism.
Check the operation of the seat belt height adjustment mechanism.
Upper trim, 5-door model
Removing
Remove the front seat belt see relevant chapter below.

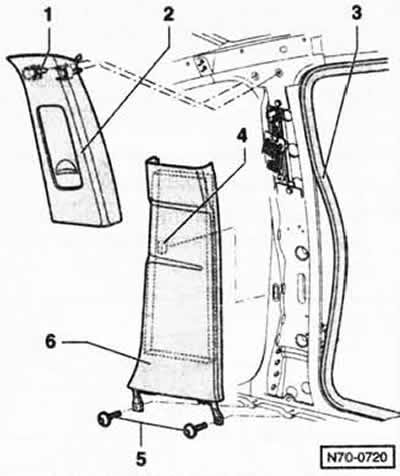
Acting on the top trim -2- from below, pull it away from the B-pillar and unfasten it at the clips -1-.
Remove the belt eye through the height adjustment mechanism and remove the lining.
Installation
Check the clamps for damage and correct positioning on the cladding, replace the clamps if necessary.
Installation is carried out in reverse order. When doing this, ensure that the door seal is positioned over the edge of the trim and that the belt height adjustment knob is correctly positioned in the adjustment mechanism.
Check the operation of the seat belt height adjustment mechanism.
Lower trim, 5-door model
Removing
Remove sill trim, see relevant chapter below.
Release screws -5-, see figure N70-0720.
Insert a plastic wedge between lower trim -6- and door seal -3- and unfasten trim at spacer clip -4- from B-pillar.
Installation
Installation is carried out in reverse order. When doing this, ensure that the door seal is positioned over the edge of the trim.

Visitor comments