Note: Before installation, check the spacer and spring clips for damage and replace the clips if necessary. Make sure that the door seal is positioned over the edge of the respective trim.
A-pillar upper trim
Remove the door seal from the A-pillar.
Using a plastic wedge, loosen the trim at the top and remove it from the A-pillar.
A-pillar lower trim
Driver's side: remove lever cable drive hood lock engine compartment.
Acting on the lining from below, pull it away from the pillar A, release the spring clips at the top and bottom and remove the lining.
B-pillar upper trim
3-door model
Remove rear side trim see relevant chapter above.
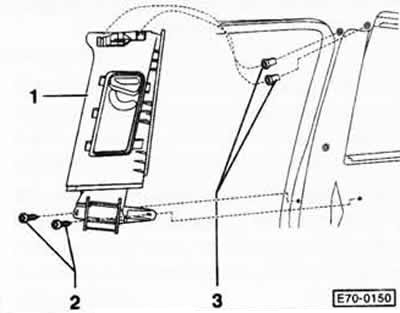
Release screws -2- at bottom and slacken trim -1- at top at spacer clips -3-.
Pull the front seat belt out of the guide bracket at the bottom, see further chapter «Removal and installation of a forward seat belt».
Pull the seat belt out through the height adjustment mechanism and remove the trim.
After installation, check the operation of the seat belt height adjustment mechanism.
5 door model
Remove B-pillar lower trim see relevant chapter above.
Unscrew the screws at the bottom and release the upper trim at the upper spring clips.
Remove the front seat belt see relevant chapter below.
Pull the seat belt out through the height adjustment mechanism and remove the trim.
After installation, check the operation of the seat belt height adjustment mechanism.
B-pillar lower trim
5 door model
Insert a plastic wedge between the door trim and seal, release the trim at the top and bottom at the clips and remove.
C-pillar upper trim
3-door model: remove rear side trim, see relevant chapter above.
5-door model: remove C-pillar lower trim, see relevant chapter above.
Remove rear headlining trim downwards.
Remove the trunk lid support, see relevant chapter above.
Remove the trim on the closing rear part of the body, see relevant chapter above.
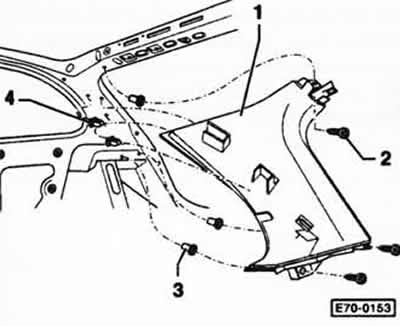
3-door model
5 door model
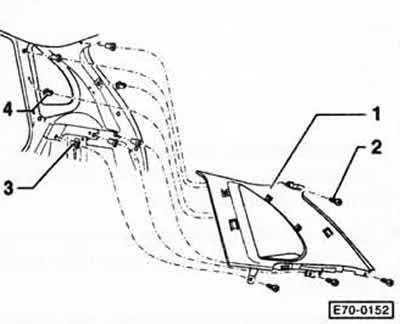
Release screws -2-, release trim -1- at clips -4- from rear to front and remove. 3 - spacer nuts.
Rear side trim
3-door model
Fold forward the cushion and backrest of the rear seat.
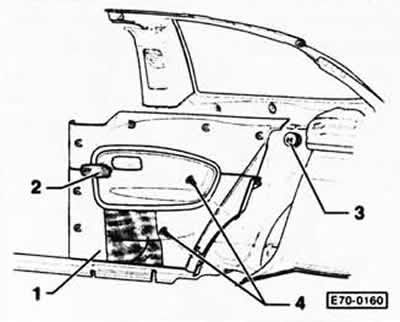
Pull out clips -4-. 2 - loudspeaker grille.
Loosen trim -1- at clips -3- and remove.
C-pillar lower trim
5 door model
Fold forward the cushion and backrest of the rear seat.
Unscrew the two plastic nuts from the casing.
Loosen and remove trim at the top two clips.
Sill trim
3-door model: Remove rear side trim, see relevant chapter above.
5-door model: remove B-pillar lower trim, see relevant chapter above.
Fold forward the rear seat cushion.
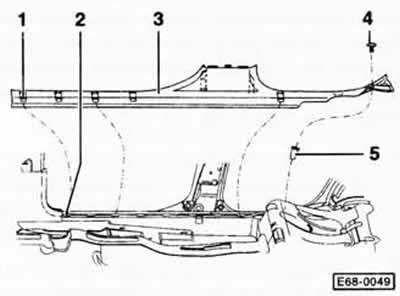
Pull clamp -4- out of bushing -5-.
Note: The illustration shows the sill trim for a 5-door model.
Insert plastic wedge between door sill trim -3- and door seal from front and pull clips -1- from rear side of sill trim out of holes -2-.
Remove trim -3- from sill upwards.
Support for rear lid
Fold forward the rear seat cushion.
Remove the trim on the closing rear part of the body, see relevant chapter.
Remove the rear seat belt see relevant chapter below.
Unscrew 3 screws and remove the support.
Side trim in luggage compartment
3-door model: Remove rear side trim, see relevant chapter above.
5-door model: remove B-pillar lower trim, see relevant chapter above.
Remove the trim on the closing rear part of the body, see relevant chapter.
Pull out the clips and remove the lining.
Facing of the closing rear part of the body
Remove the rear door seal.
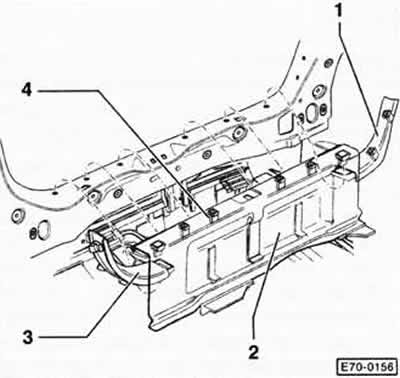
Using a plastic wedge, first release from clips -4- and remove center trim -2-.
Using a plastic wedge, release from the clips and remove the left -1- and right -2- facings.

Visitor comments