Since the engine must be completely disassembled, follow these guidelines for completely disassembling the engine:
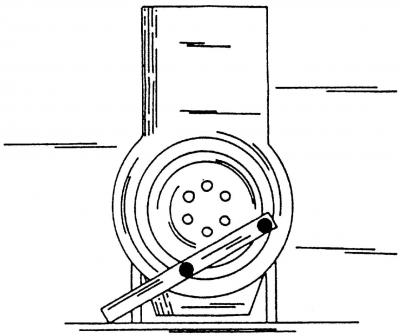
Pic. 70. Blocking with a flywheel lock
- remove the gearbox from the engine. On a vehicle with a manual transmission, with a screwdriver inserted into the flywheel ring gear, fix the flywheel in a stationary position and remove the flywheel mounting bolts. To securely fix the flywheel, you can drill two holes in the metal strip and use the clutch bolts to screw it to opposite sides of the flywheel (pic. 70) and unscrew the flywheel bolts;
- before removing the flywheel with a punch, mark the relative position of the pressure plate and the flywheel to avoid installation errors. Unscrew the crankshaft pulley bolt from the front of the engine;
- on a vehicle with an automatic transmission, remove the drive pulley.
Further work on disassembling the engine is carried out on its front. Perform the following operations:

Pic. 71. Front of the engine with installed parts: 1 - clamp for engine mount; 2 - V-belt tensioner; 3 - generator; 4 - bracket for generator and power steering pump
- unscrew bracket bolts 1 (pic. 71) engine mounts on top of the engine;
- unscrew the tensioner 2 located under it for the V-belt (3 bolts);
- disconnect the wire end «mass» cable, cable clamp, unscrew the two bolts securing the generator and remove the generator 3;
- mark bolts (six bolts of different lengths) and unscrew the generator support bracket and power steering pump 4;
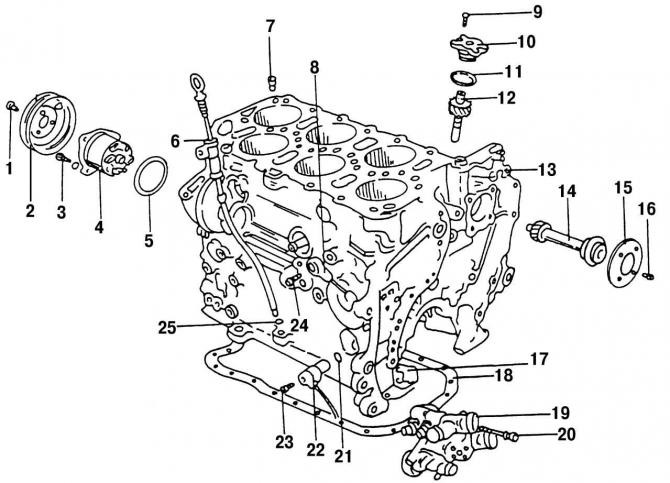
Pic. 69. Cylinder block with parts installed on it: 1 - bolt, 25 Nm; 2 - pulley of the cooling pump; 3 - bolt, 20 Nm; 4 - pump of the cooling system; 5 - O-ring, always replace with a new one; 6 - oil dipstick with guide tube; 7 - oil drain blocking, 5 Nm; 8 - knock sensor No. 2 (to correct the ignition timing); 9 - screw, 5 Nm; 10 - oil pump drive cover; 11 - O-ring, always replace with a new one; 12 - oil pump drive; 13 - cylinder block; 14 - intermediate shaft; 15 - adjusting washer, the inscription on it should look up; 16 - bolt, 10 Nm; 17 - O-ring, always replace with a new one; 18 - oil crankcase gasket; 19 - thermostat housing; 20 - bolt, 10 Nm; 21 - O-ring, always replace with a new one; 22 - crankshaft speed sensor; 23 - bolt, 5 Nm; 24 - bolt, 20 Nm; 25 - O-ring
- unscrew the dipstick guide tube 6 (pic. 69), pull it out of the cylinder block and remove the sealing ring 25:

Pic. 72. Intake manifold air intake chamber: 1 - oil dipstick tube; the arrows show the camera mounting bolts
- unscrew the fastening bolts (pic. 72, arrows) air suction chamber of the intake manifold;
- remove the coolant pump pulley bolt and the air intake plenum harness (remove the hose, disconnect the throttle position sensor connector, remove the clamp from the wiring harness and disconnect «mass» cable);
- remove the air intake brackets. First, disconnect the EGR pipe (EGR) from the throttle body. Then unscrew the three air intake chamber bolts from the cylinder head and remove the air intake chamber together with the gasket;
- remove the engine cooling pump, to do this, disconnect the hose going to the thermostat housing, disconnect the plug and remove the pump down from the rubber mount. After removing the pump, remove the pump mount;
- disconnect the plug from the EGR valve, open the two clips to release the wiring harness and disconnect the next plug located nearby;
- disconnect the plug connector of the coolant temperature sensor and the fan thermal switch and unscrew the bracket fastening bolt;
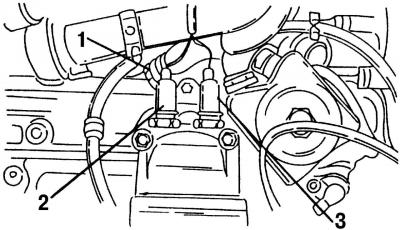
Pic. 73. Wire connections next to the oil filter: 1 - oil temperature sensor; 2 - oil pressure switch for 140 kPa; 3 - 30 kPa oil pressure switch
- disconnect the plug-in blocks of the oil temperature sensor 1 (pic. 73), oil pressure switch 2 (black-yellow cable) 140 kPa and oil pressure switch 3 (brown-blue cable) by 30 kPa;
- unscrew the four bolts securing the high voltage wire guide and remove the fuel distribution line together with the injectors (fuel distributor with injectors);
- unscrew the two mounting bolts and remove the switching valve and the inlet valve of the secondary air system;
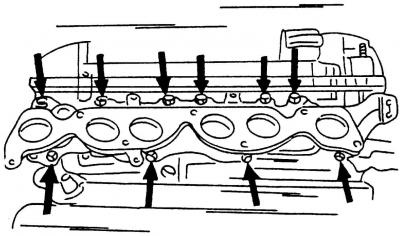
Pic. 74. The attachment points of the intake manifold are shown by arrows
- unscrew the fastening bolts (pic. 74) and remove the intake manifold together with the engine lifting lug;
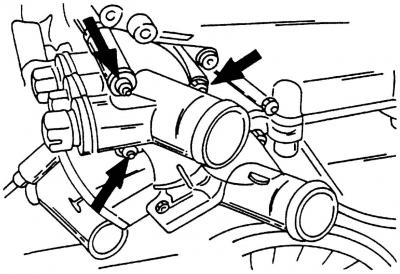
Pic. 75. The attachment points of the thermostat housing are shown by arrows
- unscrew the thermostat housing (pic. 75);
- unscrew the nut and remove the EGR valve together with the bracket (loosen the union nut, unscrew the 2 bolts);
- Remove the cylinder head cover and gasket. This will release the holders of the fuel lines;
- unscrew ten bolts of fastening and remove the top protective cover of the drive of engine units. Unscrew the chain tensioner, which is located on the side of the cylinder head;
- mark (preferably in color) on the outside of the camshaft drive chains, their direction of rotation;
- unscrew six bolts from the cylinder block and five bolts from their oil pan and remove (on the back of the engine) crankshaft sealing flange. It is advisable to replace the sealing ring with a new one;
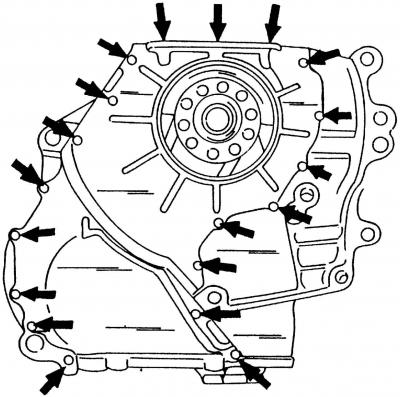
Pic. 76. The attachment points of the lower protective cover of the drive of engine units are shown by arrows
- remove sixteen bolts (pic. 76) in the cylinder block, three bolts in the oil sump, one bolt - from the bracket and remove the lower protective cover for the drive of engine units;
- remove the camshaft drive chains and other drive parts (see subsection 2.7.);
- remove the cylinder head (see point 2.3.1);
- Disconnect the coolant hose from the cooling system pump and from the cylinder block, remove the gasket, unscrew the oil cooler mounting bolts and remove it together with the coolant hose. Make sure that the coolant does not leak;
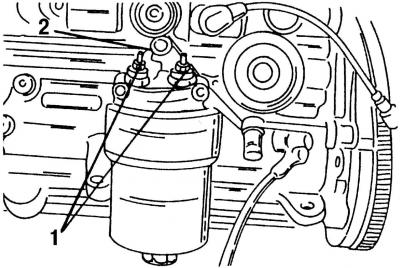
Pic. 77. Mounting the oil filter on the engine: 1 - oil pressure switches
- remove the oil filter with gasket. If necessary, unscrew both oil pressure switches 1 (pic. 77).
- remove knock sensor 8 (pic. 69) and crankshaft speed sensor 22;
- block the crankshaft flywheel with a lock (pic. 70) and remove the crankshaft vibration damper bolt.
If you need to remove the intermediate shaft:
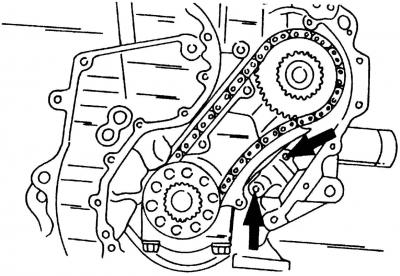
Pic. 78. The attachment points of the tensioner of the single-row chain of the intermediate shaft are shown by arrows
- unscrew the two fixing screws (pic. 78) single chain tensioner;
- block the crankshaft with a retainer, unscrew the bolt located in the center of the intermediate shaft sprocket and remove the sprocket along with the chain (pre-marking the direction of movement of the chain). The chain guide can also be removed;
- unscrew the four bolts securing the intermediate shaft and remove it;
- remove the cooling system pump together with the pulley;
- remove the oil pan (see subsection 4.1);
Note. After removing the oil pan, lay it on the bottom surface.
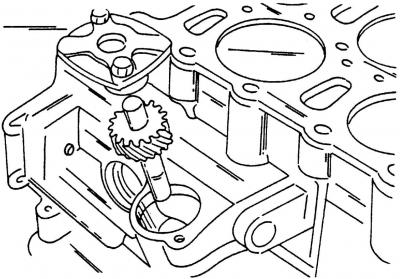
Pic. 79. Removing the oil pump drive shaft
- unscrew the two mounting bolts and remove the oil pump drive shaft cover. Then remove the drive shaft (pic. 79);
- remove the oil pump (see subsection 4.2.1);
- if only the crankshaft is to be removed, the pistons and connecting rods may remain inside the cylinder block. In this case, mark and remove the connecting rod bearing caps in turn and leave them assembled with the liners. Otherwise, remove the pistons and connecting rods (see subsection 2.4.1). Please note that the used «malleable screws» should always be changed;

Pic. 80. Checking the axial free play of the crankshaft using a measuring device
- measure the axial free play of the crankshaft. To do this, install a rack with an indicator on the front of the cylinder block so that the indicator foot rests against the flange of the front end of the crankshaft (pic. 80). Use a screwdriver to move the crankshaft to the side, and set the device to zero, then move the shaft to the other side. The arrow of the device will show the axial free play of the shaft, which should be no more than 0.25 mm. If the stroke is greater, then bring it back to normal by replacing the old half-rings with new ones or by installing half-rings of increased thickness.
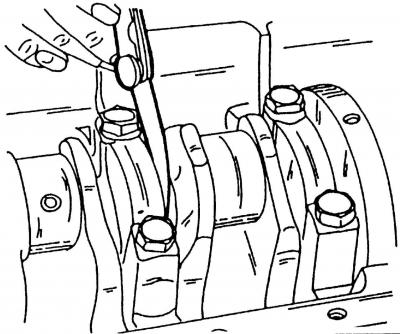
Pic. 81. Measurement of the axial free play of the crankshaft with a feeler gauge
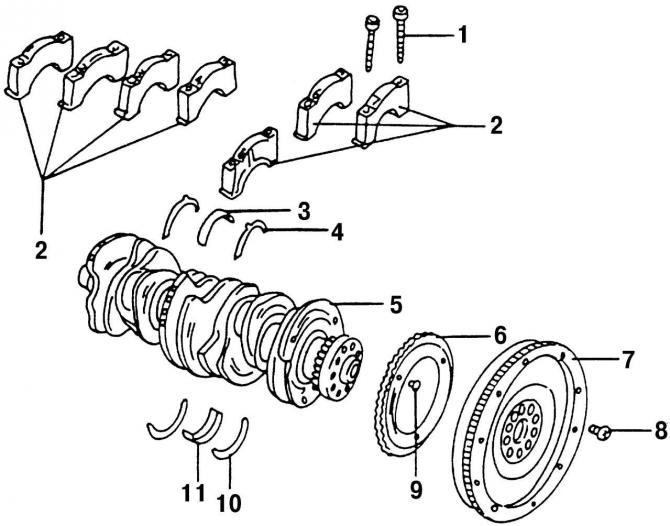
Pic. 82. Elements of the crankshaft and main bearings: 1 - bearing cover bolt; 2 - main bearing caps (main bearing No. 1 - from the side of the vibration damper); 3 - main bearing shell; 4 - adjusting thrust semi-ring bearing No. 5; 5 - crankshaft; 6 - toothed rim of the speed sensor; 7 - flywheel; 8 - flywheel mounting bolt, always a replacement; 9 - gear rim bolt; 10 - adjusting washer in the cylinder block for bearing No. 5; 11 - bearing shell of the cylinder block. Gear rim 6 of the speed sensor should always be changed if it was removed
Middle support (bearing number 5) has upper and lower thrust half rings 4 and 10 (pic. 82), which regulates the axial free play of the crankshaft. Also, there are two half rings on the other side of the main bearing cap and cylinder block; if a measuring device is not available, the axial play can be measured with a feeler gauge (pic. 81) on the middle connecting rod journal, between the connecting rod bearing flange, where the thrust half rings are located, and the surface of the crankshaft web;
- Loosen the flange mounting bolts at the front of the engine and remove the flange. There is an o-ring in the flange, which should be knocked out immediately;
- unscrew bolts 1 gradually crosswise (pic. 82) crankshaft bearing caps 5 and remove them one by one. Check that the caps are labeled with the correct numbers. Carry out the numbering of the bearing caps from the side of the drive pulley of the engine units;
- remove the bottom bushings (No. 1 to 7) journal bearings and place them together with their respective bearing caps. The lower bearing shells of the crankshaft do not have grooves on the inner surface. No adjustments can be made on them. In case of scuffing, risks or delaminations, replace the liners with new ones;
- remove the crankshaft from the bearing seats;
- take out the top shells and put them in with the corresponding bearing caps. The upper bearing shells of the crankshaft have grooves for lubrication;
- remove the lower thrust half ring from the middle support (from bearing no. 5).

Visitor comments