Note. When removing the electric fuel pump, the fuel tank must be filled no more than 2/3.
Warning! When removing the fuel pump, some fuel may leak out. Fuel vapors are poisonous and flammable, therefore it is necessary to ensure good ventilation of the workplace.
Remove the fuel pump in the following order:
- disconnect the terminal «–» from AB;
- unscrew the filler cap for a short time in order to relieve pressure in the system;
- remove the mat on the right side under the second row of seats, unscrew the mounting bolts and remove the hatch for the electric fuel pump and fuel level sensor;

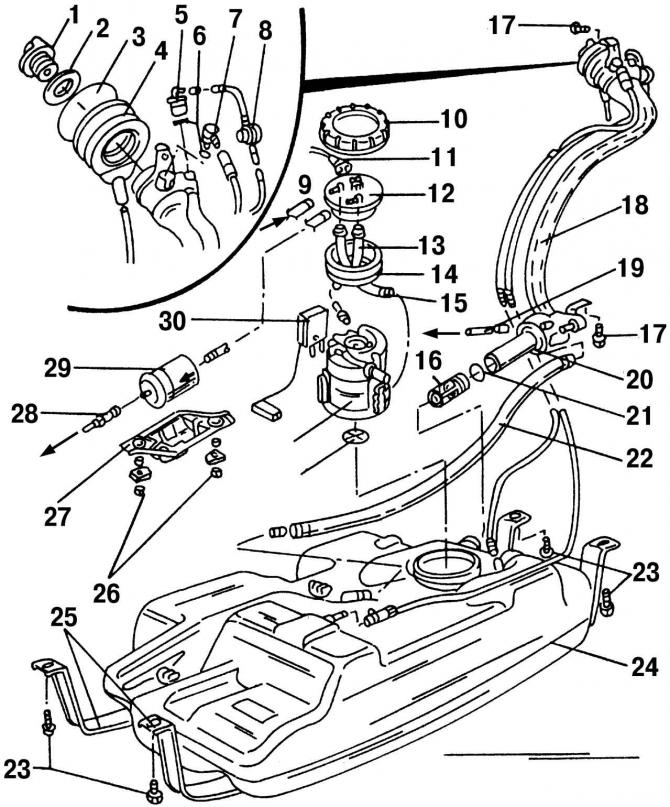
Pic. 206. Details of the power supply system located near the fuel tank: 1 - fuel tank cap; 2 - sealing ring; 3 - safety ring; 4 - rubber seal; 5 - check valve; 6 - O-shaped sealing ring; 7 - ventilation valve; 8 - pressure reducing valve; 9 - return pipeline; 10 - union nut; 11 - plug, black, pump and fuel quantity sensor; 12 - flange; 13 - supply fuel hose; 14 - sealing ring; 15 - return hose; 16 - check valve; 17 - bolt, 10 Nm; 18 - filler pipe; 19 - ventilation pipeline; 20 - sealing ring; 21 - safety ring; 22 - ventilation pipeline; 23 - bolts, 25 Nm; 24 - fuel tank; 25 - fastening of the fuel tank; 26 - bolts, 20 Nm; 27 - fuel filter cover/holder; 28 - fuel line (black color); 29 - fuel filter (observe the direction of fuel flow); 30 - fuel level sensor in the tank; 31 - fuel pump; 32 - strainer
- disconnect the four-pin connector 11 from the pump (pic. 206) fuel level sensor 30 fuel pump 31;
- disconnect the supply and return 9 pipelines from the flange 12;
- using a special wrench VW 3217, remove the flange 12. If there is no special tool, unscrew the plastic nut, which has small ribs, using a screwdriver (better blunt) hitting her lightly;
- remove flange 12 and sealing ring 14 from the fuel tank opening;
Note. Two fuel lines are connected to the lower side of the flange: supply line 13 (marked with a letter «V») and return (recycling) 15 (marked with a letter «R»).
- turn the fuel pump to the left, moving it out of the bayonet mount, and remove it.
Install the fuel pump in the reverse order of removal, following these recommendations:
- when installing the pump, do not deform the float of the fuel level sensor in the tank;
- when installing the flange, pay attention to its position. It has an arrow, which, after installation, should be in line with the stamped arrow in the tank;
- moisten the o-ring 14 of the flange with gasoline before assembling;
- check that the supply and return pipes are firmly seated. Secure them with spring clamps.

Visitor comments