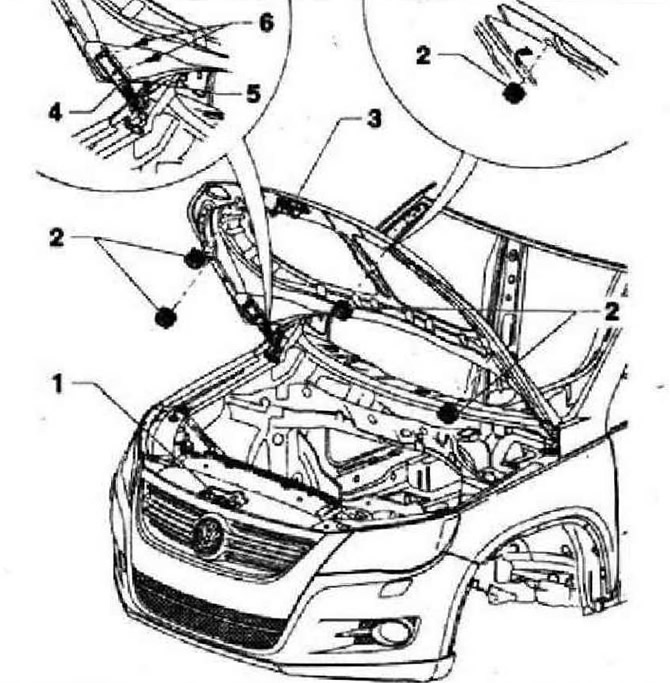
Instructions: When adjusting the hood, the vehicle must be on a level surface. The adjustable stops -2- on the left and right are not intended for adjusting the hood. They are designed to fix the position of the hood -5- and to dampen vibrations. The hood is adjusted correctly if it smoothly passes into other body panels, is not recessed inward and does not protrude outward, and has a uniform gap around the entire perimeter. The hood should be fixed in the lock without noticeable effort.
Remove locking hook -3-. By loosening the bolts -5- of the hood hinges on the left and right, but without turning them out, the position of the hood can be adjusted. By loosening the bolts -6- of the hood hinges on the left and right, but without turning them out, it is possible to adjust the height of the hood in the rear. By unscrewing and tightening the adjustable stops -2-, you can adjust their level to the position of the bonnet. Ensure gaps are even. After adjustment, the hinges -4- and the bolts -5- and -6- must be treated with anti-corrosion treatment. After adjusting the bonnet, the locking hook -3- can be installed and adjusted again. By changing the position of the lock -1- it is possible to adjust the height of the position of the front part of the hood.
Hood lock adjustment
Instructions: Do not remove the hood latch. It is shown in the removed state for illustrative purposes only.
Remove the decorative grille. By loosening the bolt -2- at the front and the bolts -5- at the rear, the clearance at the front of the bonnet can be adjusted. Tightening torque for bolts -2 and 5- 12 Nm. Adjust the position of the locking hook.

Visitor comments