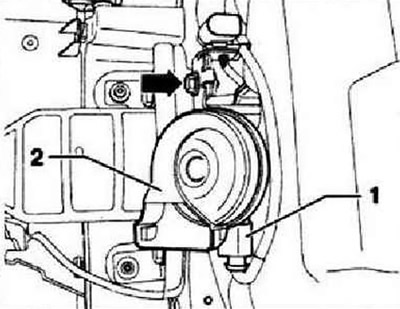
Removing and installing high-frequency horn -H2- and low-frequency horn -H7-
Note: The high frequency horn -H2- and the low frequency horn -H7- are controlled in parallel by the onboard supply control unit -J519-. Removal and installation of both sound signals is carried out in the same way, therefore the description is given only for one. Sound signals are installed on the left and right next to the spars.
Switch off the ignition and all electrical consumers. Remove the front bumper cover. Disconnect connector -1-. Remove securing bolt -arrow- and remove horn -2- together with retaining plate.

Installation in reverse order.
Instructions: Position the horn during installation so that it does not touch neighboring parts.
Tighten the mounting plate bolts to the side members to 20 Nm.
Checking high-frequency horn -H2- and low-frequency horn -H7-
Sound signals (high frequency horn -H2- and low frequency horn -H7-) can be checked using the final control diagnosis of the onboard power supply control unit -J519-.
Horn buttons -H-
The horn is activated by pressing the spring-loaded trim in the middle of the steering wheel. Depending on the vehicle's equipment, the horn buttons can either be integral to the steering wheel or integrated into the driver's airbag module and cannot be replaced individually. If the buttons are defective, the airbag module or the steering wheel must be replaced. Remove steering wheel. Remove the airbag module from the driver's side.

Visitor comments