Safety regulations for work on the power system
ATTENTION: When performing installation work. especially in the engine compartment due to its dense layout, the following rules must be observed. Highways of all types (e.g. fuel, hydraulic, activated carbon absorber, cooling system, air conditioning circuit, brake system, vacuum), as well as electrical wires must be laid as they were originally laid. Sufficient space must be provided when working on all moving or hot parts. Fuel and fuel lines may be hot (risk of burns)! In addition, the fuel in the lithium system is under pressure! Before disconnecting the elements, wrap the connection point with a cloth and then release the pressure by carefully loosening the connection!
Procedure for incorrect refueling
Caution: Incorrect filling due to insufficient diesel lubrication can cause irreversible damage to high-pressure components, in particular the injection pump. In this case, damage in the form of scuffing and the separation of small particles can be expected. These particles can later cause damage to the pressure control valves and nozzles.
There are 2 different options for actions when an incorrect refueling is detected
Option 1: Incorrect refueling was detected BEFORE the engine was started, and the engine did NOT start.
Option 2: Incorrect refueling was detected AFTER starting the engine. Contaminated or incorrect fuel enters the fuel system and can reach high pressure components.
Procedure for option 1
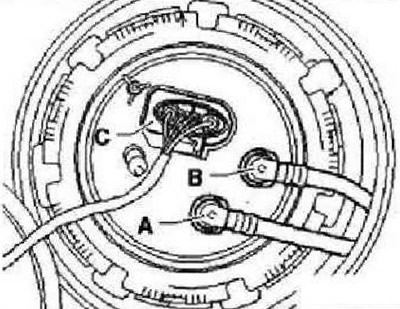
Do not turn off the ignition. Empty the fuel tank as far as possible via the filler socket using the fuel extraction tool -VAS 5190-. Unplug connector for supplementary fuel pump -V393- (Inline ECR) in the engine compartment. Remove the rear bench seat. Remove the fuel delivery module cover.
Instructions: To unlock and remove the line, squeeze the retaining ring.
Remove fuel supply line (black or black marking) -A- from the fuel delivery module.

Connect pipe -VAS 6550/1- of pressure gauge to fuel supply point -A-. Insert the free end of the tube into a suitable container. Connect the tester and select in the mode Guided functions "Checking the electrical (their) fuel (s) pump (ov) ".
Instructions: Let the fuel pump run for 30 seconds only.
Repeat this process until the fuel tank is completely empty. Fill the fuel tank with 5 liters of diesel fuel and run again in the Guided Functions mode "Checking the electrical (their) fuel (s) pump (ov) ". Connect the fuel supply line (black or black marking) -A- to the fuel supply module. Connect connector for supplementary fuel pump -V393- (Inline ECR) in the engine compartment. Fill the tank completely with diesel fuel. Do a test drive.
Procedure for option 2
Empty the fuel tank as far as possible via the filler socket using the fuel extraction tool -VAS 5190-. Sow the rear bench seat. Remove the fuel delivery module cover,
Instruction: To unlock and remove the fuel line, compress the retaining ring.
Remove fuel return line (blue or blue marking) -A- from fuel supply unit. Connect pipe -VAS 6550/1- of pressure gauge to fuel supply point -A-. Insert the free end of the tube into a suitable container. Connect the tester and select in the mode Guided functions "Checking the electrical (their) fuel (s) pump (ov) ".
Instructions: Let the fuel pump run for 30 seconds only.
Repeat this process until until the fuel tank is completely empty. Remove the fuel delivery module and check the fuel tank for dirt and chips. If necessary, clean the tank and then install the fuel supply module, Fill the fuel tank with 5 liters of diesel fuel and run again in the Guided functions "Checking the electric fuel pump". Replace fuel filter. Replace the following high pressure components: injection pump, high pressure fuel lines, high pressure accumulator (Rail), including air pressure regulating valve -N276- and fuel pressure sender -G247-, injectors (piezo injectors), fuel return lines (drain lines). Connect fuel return line (blue or blue marking) -A- to the fuel supply module. Fill the tank completely with diesel fuel. Fill/prime the system with fuel, Carry out a test drive.

Visitor comments