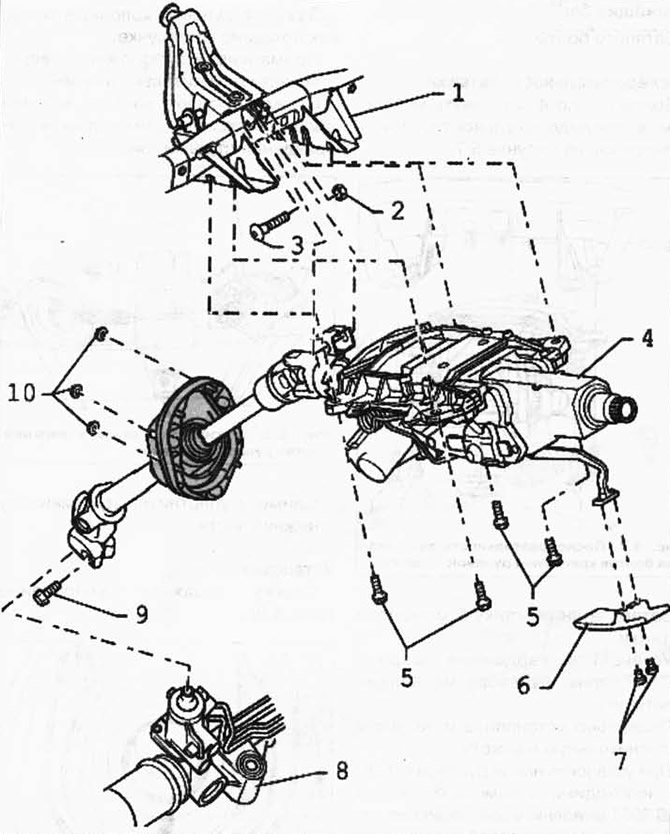
Pic. 5.1. Steering column components:
1 - transverse beam of the steering column; 2 - self-locking nut; 3 - screw with an internal asterisk; 4 - steering column; 5 - a bolt with a six-sided head; 6 - handle; 7 - bolt; 8 - steering gear with amplifier; 9 - a bolt with a six-sided head; 10 - self-locking nut.
Removing
WARNING: Before working on the electrical system and removing the steering wheel, the following conditions must be met. Unscrew the negative battery terminal. The wheels must be straight. Failure to follow these instructions may result in the failure of the airbag system during subsequent operation.
Set the wheels straight.
Set the automatic transmission selector to position «N» and turn off the ignition.
Remove the trim in the footwell on the driver's side.
Remove the steering column switch block.
Raise the vehicle.
If equipped, remove the screen from the steering gear (2 bolts).
Unscrew the bolt of the universal joint of the steering gear and remove the joint from the steering gear.
Carefully insert the lower shaft into the upper shaft until it stops.
Vehicles with 10-cyl. diesel engine
Unscrew the steering mechanism and move to the left.
Continuation of assembly operations for all vehicles
Loosen the 3 seal nuts (pic. 5.2).
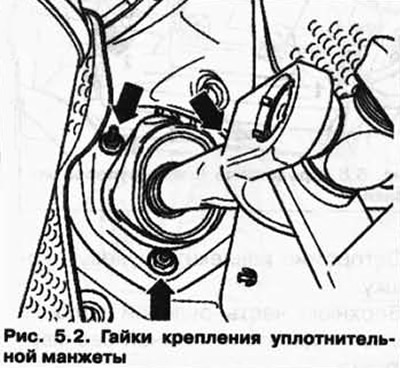
On vehicles with some engine options, the top nuts are also accessible from the top of the engine compartment.
Remove the stoplight switch.
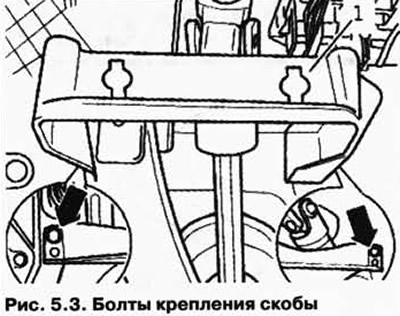
Remove bracket 1 (pic. 5.3).
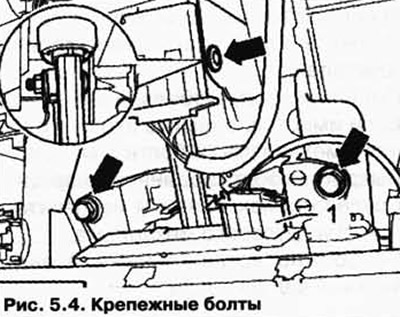
On vehicles with electric steering column, remove plug 1 (pic. 5.4).
Disconnect the remaining connectors and remove the wires from the holders to the right and left of the steering column.
Remove the bolts (pic. 5.4).
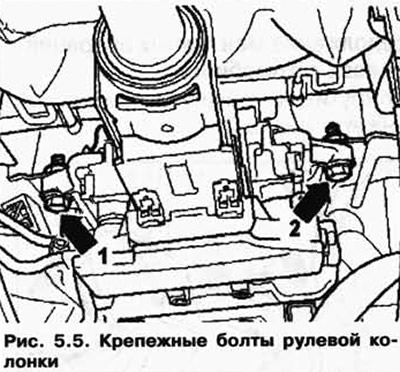
Unscrew bolt 1 and at the very end bolt 2 (pic. 5.5).
Carefully remove the steering column.
The upper part of the steering column must not be separated from the lower part without marking.
If the gearing does not take its original position, then during further operation this may lead to the occurrence of knocks.
If necessary, remove the sealing collar.
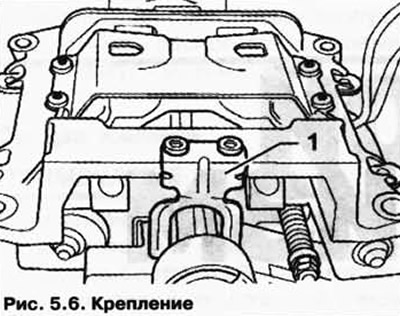
ATTENTION: Attachment 1 must not be removed (pic. 5.6). It serves as protection during transportation.
Installation
Installation is carried out in the reverse order, paying attention to the following.
When replacing a mechanical steering column, it is also necessary to change the handle for its adjustment.
Establish a steering column on a cross beam.
Insert and hand-tighten the opposite bolts.
Tighten the bolts.
Tightening sequence
Bolts 1 to 4 should be torqued in the sequence shown in Figure 5.7.
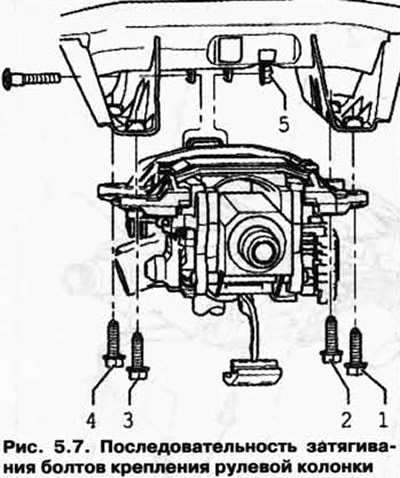
Then tighten nut 5 to the tightening torque.
Install the universal joint on the steering gear and tighten.
Correctly install and tighten the sealing collar.
When installing a new steering column, use the tester VAS 5051 to adapt the electric steering column lock.
For this, in the mode «Gefuehrte Funktionen/ Guided functions» select system first «Wegfahrsicherung/ Immobilizer», and then «Anpassung der ELV/ Adaptation of the electric steering column lock».
Then carry out the basic setting of the steering angle sender G85 using the tester VAS 5051.
Tightening torques
Cardan joint to steering gear (use new bolt) - 40 Nm + 90°.
Screen on steering gear (if available) - 10 Nm.
Steering column to cross member (use a new nut - 20 Nm.
Sealing collar on the front wall - 4 Nm.

Visitor comments