NOTE: The on-board tool, spare wheel or tire repair kit, detachable tow ball are located in the cargo area under the raised floor.
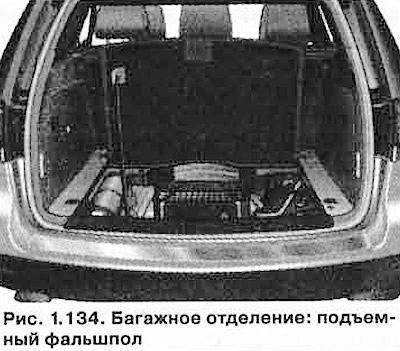
To make it easier to remove the spare wheel or tool, you can insert a support into the raised raised floor.
Onboard tool
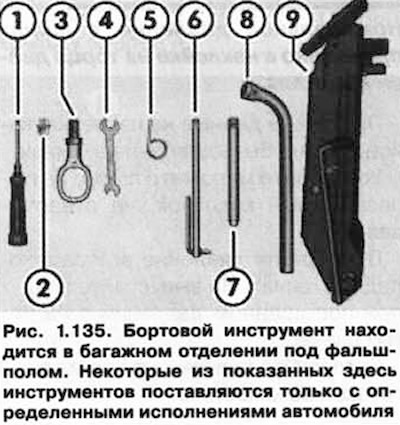
The onboard tool includes:
- 1. Screwdriver with a hexagon in the handle for removing and screwing in wheel bolts. The working body of the screwdriver is replaceable. The screwdriver is inserted into the wheel key;
- 2. Adapter for secret bolts;
- 3. Screw-in towing eye;
- 4. Wrench 10x13mm;
- 5. Wire puller for removing wheel covers or wheel bolt caps;
- 6. Headlight removal tool;
- 7. Mounting pin for easy wheel installation;
- 8. Wheel wrench;
- 9. Jack. Before placing the jack in the tool box, the jack leg must be completely screwed in. Then you should attach the handle to the jack.
The removable tow ball is located under the tool.
Adapter for security bolts
It is recommended that you always carry an adapter for security bolts along with your on-board tool.
At the end of the adapter, the code number of the wheel lock bolts is stamped. If you lose an adapter, you can order a new adapter using this number. Record the code number and keep the record separate from the vehicle.
Folding spare wheel
To remove the spare wheel, lift the raised floor and place a support under it (pic. 1.136).
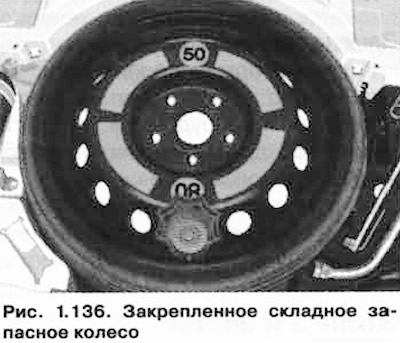
Loosen the handwheel by turning it counterclockwise.
Take out the spare wheel.
WARNING: The foldable spare tire is specifically designed for this vehicle. It cannot be replaced with another folding wheel or put on another car model. This is also true for the folding wheels of other car models. Normal tires must not be mounted on the folding spare wheel rim.
IMPORTANT: Make sure the collapsible spare wheel and on-board tool are securely stowed in the luggage compartment.
Tire repair kit
NOTE: A tire repair kit can be used to repair an air leak from a leaky tire and inflate it.
small punctures (diameter up to 4 mm), especially on a treadmill, can be repaired with a tire repair kit.
Tire sealing
Take out the sticker «max. 80 km/h (50 mph)» from the kit and stick it in the driver's field of vision on the front panel.
Do not remove the foreign body (e.g. screw or nail) from the tire.
Remove the cap from the valve and using the special screwdriver for the spool included in the kit, unscrew the spool and lay it in a clean place.
Pour all the sealant from the container into the tire. Follow the instructions in the attached manual.
Remove the container from the valve and screw the spool into the valve.
Screw the compressor inflation hose onto the tire valve as far as it will go.
Connect the compressor to the auxiliary battery connection pins (pic. 1.137).
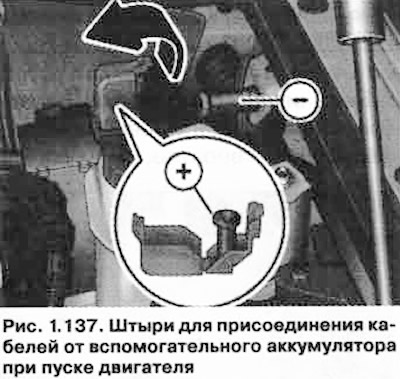
Red compressor cable clamp to positive «+», black clamp to minus «-». Position the cable from the compressor so that it does not come into contact with rotating parts in the engine compartment.
Start the engine and turn on the compressor.
Check if the air bleed screw on the pressure gauge is closed.
The compressor must inflate the tire to a pressure of 2.5 to 3.5 bar. Switch off the compressor after 10 minutes at the latest. The compressor must not overheat. If there is not enough pressure in the tire, then the tire damage is too great. It was not possible to make the tire tight again. Stay where you are and look for help.
If you managed to create a tire pressure of 2.5 to 3.5 bar, immediately start driving, but the speed should not exceed 80 km / h.
After 10 minutes of driving, check the tire pressure.
Reconnect the compressor hose (see above) and read the pressure gauge.
If, after 10 minutes of driving, the pressure is below 1.8 bar, stop the vehicle and contact the nearest workshop.
If after 10 minutes of driving the pressure is higher than 1.8 bar - adjust the tire pressure to the nominal (see sticker).
Drive at a speed of no more than 80 km/h to the nearest tire repair shop.
Repair or replace the damaged tire.
The tire repair kit is intended only for getting to the nearest tire repair shop if the tire is damaged. Repair or replace the damaged tire. Follow the directions in the manual that came with the kit.
The tire repair kit can be used at temperatures down to -20°C.
Check the expiration date of the kit. At the expiration date or after using the kit, contact a Volkswagen workshop and replace the sealant bottle.
Tire repair kit contains:
- hose;
- container with sealant;
- compressor;
- manometer (with screwed air outlet);
- speed warning sticker
- user manual.
Tire sealing
Take out the sticker «max. 80 km/h (50 mph)» from the kit and stick it in the driver's field of vision on the front panel.
Do not remove the foreign body (e.g. screw or nail) from the tire.
Remove the cap from the valve and using the special screwdriver for the spool included in the kit, unscrew the spool and lay it in a clean place.
Pour all the sealant from the container into the tire. Follow the instructions in the attached manual.
Remove the container from the valve and screw the spool into the valve.
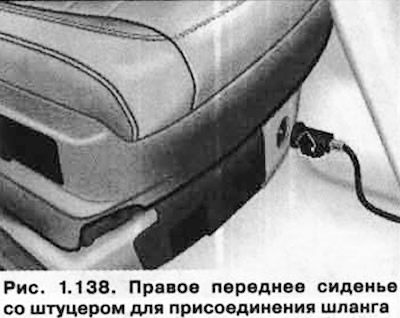
Screw one end of the hose onto the tire valve and the other end onto the fitting under the right front seat (pic. 1.138).
Start the engine.
Check if the air bleed screw on the pressure gauge is closed.
Press the lever under the pressure gauge.
Leave the engine running until the tire pressure reaches 2.5 to 3.5 bar. If there is not enough pressure in the tire, then the tire damage is too great. It was not possible to make the tire tight again. Stay where you are and look for help.
If you managed to create a tire pressure of 2.5 to 3.5 bar, immediately start driving, but the speed should not exceed 80 km / h.
After 10 minutes of driving, check the tire pressure.
Reconnect the hose to the tire valve and to the fitting (see above).
Read the tire pressure on the pressure gauge.
If after 10 minutes of driving the pressure is higher than 1.8 bar - adjust the tire pressure to the nominal (see sticker).
Drive at a speed of no more than 80 km/h to the nearest tire repair shop.
Repair or replace the damaged tire.

Visitor comments